# AI Translation for Obsidian
[English](#english) | [中文](#中文)
---
## English
### Introduction
**AI Translation** is a lightweight, multi-model AI translation plugin designed specifically for Obsidian. It natively connects to major global and domestic LLM providers as well as any OpenAI-compatible API endpoints, allowing you to translate selected text with one click and automatically insert the translated result directly below the original text.
### ✨ Key Features
- **Multi-Model Support**: Native integrations with DeepSeek, Tongyi Qianwen (Qwen), Doubao, Google Gemini, OpenAI, Anthropic Claude, SiliconFlow, Moonshot (Kimi), Zhipu (GLM), OpenRouter, Groq, and custom API endpoints.
- **One-Click Translation & Insertion**: Select any text in your note, right-click or press a hotkey, and the translation is inserted neatly beneath the selection.
- **Custom System Prompts**: Customize translation tone, academic style, and context with full control over the system prompt.
- **Multi-Language Targeting**: Supports translating into Chinese, English, Japanese, French, German, and any other target languages.
- **Zero Heavy Dependencies**: Pure Obsidian native implementation using `requestUrl` — lightweight, fast, and fully cross-platform (desktop & mobile).
---
### 📥 Installation
#### From Obsidian Community Plugins (Recommended once listed)
1. In Obsidian, open **Settings** > **Community plugins**.
2. Click **Browse** and search for **AI Translation**.
3. Click **Install**, then **Enable**.
#### Via BRAT (Beta Reviewers Auto-update Tester)
1. Install the **BRAT** plugin in Obsidian.
2. In BRAT settings, choose **Add Beta plugin**.
3. Enter repository URL: `https://github.com/Wolframscs/obsidian-AI-Translation`
4. BRAT will automatically download the plugin and keep it updated.
#### Manual Installation
1. Download `main.js`, `manifest.json`, and `styles.css` from the [latest GitHub Release](https://github.com/Wolframscs/obsidian-AI-Translation/releases).
2. Create a folder named `ai-translation` inside your vault's `.obsidian/plugins/` directory.
3. Place the downloaded files into that folder.
4. Reload plugins in Obsidian settings and toggle on **AI Translation**.
---
### ⚙️ Configuration & Supported Providers
In Obsidian **Settings** > **AI Translation**:
1. **AI Provider**: Choose your preferred AI service.
2. **API Key**: Enter your API key for the chosen provider.
3. **Model Selection**: Choose from preset models or enter any custom model ID.
4. **Target Language**: Specify the output language (e.g., `Chinese`, `English`, `Japanese`).
5. **System Prompt**: Customize translation instructions or use the built-in translation prompt.
6. **Test Connection**: Click the **Test Connection** button to verify network and credentials.
#### Custom API / Local Ollama Support
Compatible with any OpenAI-standard endpoint:
- **Provider**: `Custom API`
- **URL**: e.g., `http://localhost:11434/v1/chat/completions` (for local Ollama) or `https://api.your-proxy.com/v1/chat/completions`
- **Model**: e.g., `llama3`, `deepseek-r1`, etc.
---
### 🚀 Usage
1. **Context Menu**: Select text in editor -> right click -> **Translate Selection**.
2. **Command Palette**: Select text -> `Ctrl/Cmd + P` -> run `Translate Selection (Insert Below)`.
3. **Hotkey**: Assign a custom shortcut (e.g. `Alt + T` or `Ctrl + T`) under **Settings** > **Hotkeys** > search `Translate Selection`.
---
# Obsidian - Translation 插件说明文档
本插件是一款为 Obsidian 开发的轻量级多模型翻译辅助工具。支持对接国内外主流大语言模型服务及符合 OpenAI 规范的自定义 API 接口,可实现选中文本的一键翻译与自动插入对照。
---
## 📥 安装与启用
### 安装
1. 下载本插件的最新发布版本。
2. 打开 Obsidian,进入 **设置** -> **第三方插件**,点击 **打开插件文件夹** 按钮。
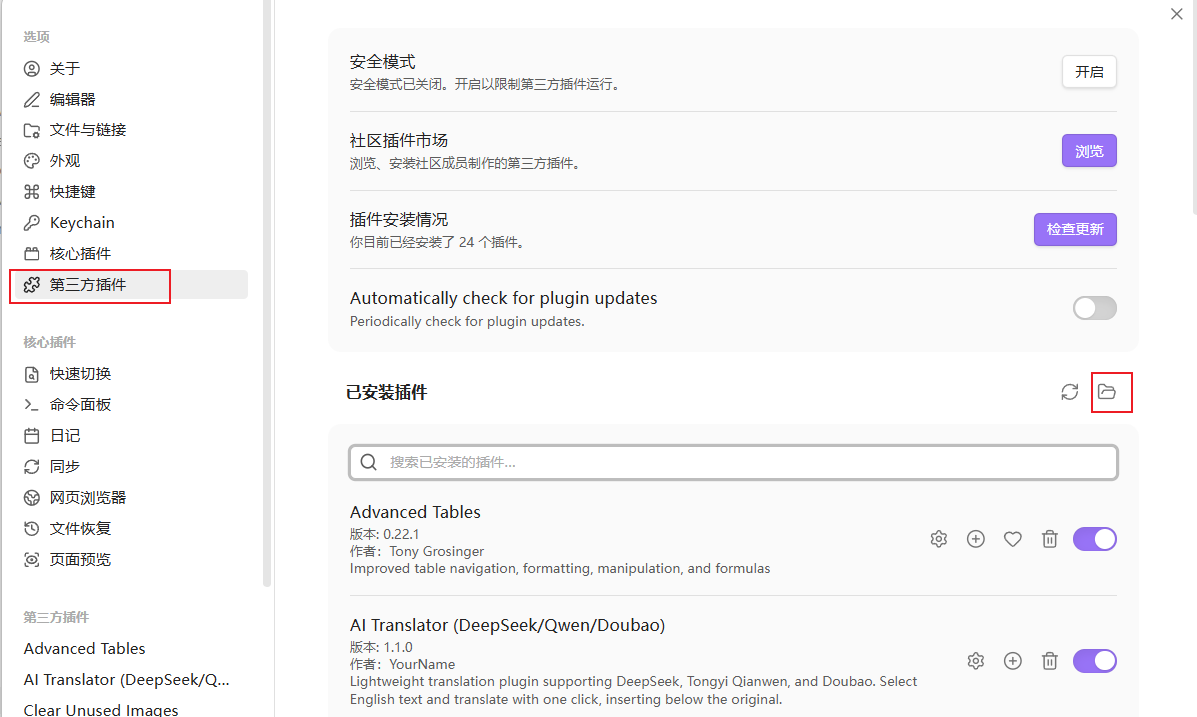
3. 将解压后的插件文件夹放入您的 Obsidian 库的 `.obsidian/plugins/` 目录下。
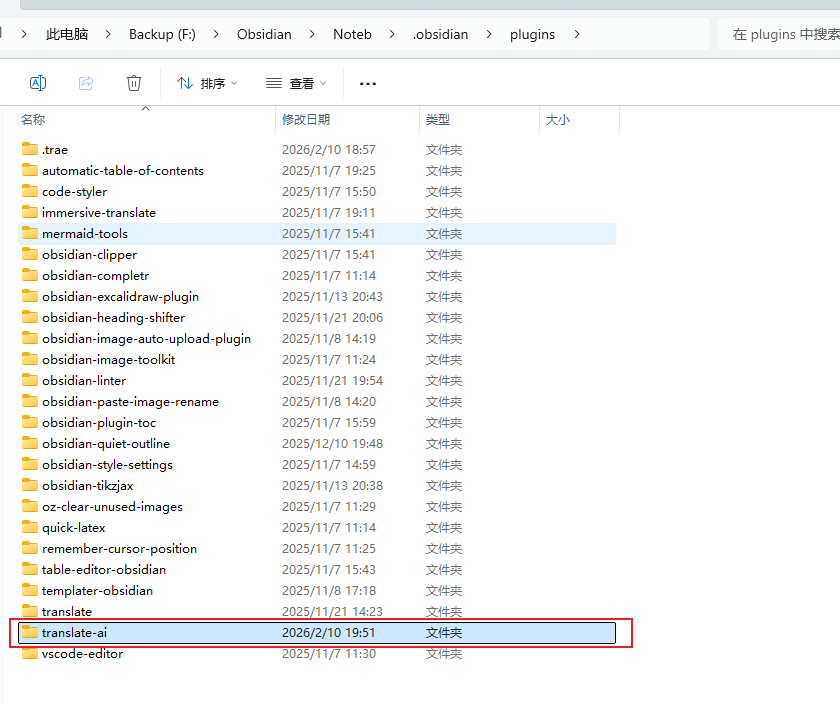
4. 重启 Obsidian,或在 **第三方插件** 配置页中点击 **重新加载插件**。
### 启用
1. 打开 Obsidian **设置**。
2. 进入 **第三方插件** 选项卡。
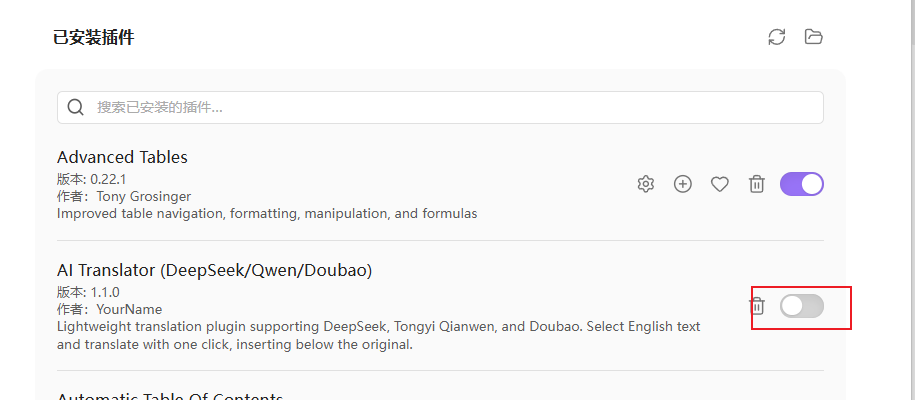
3. 找到 **Obsidian - Translation** (显示为 **AI Translator**) 并开启启用开关。

---
## ⚙️ 配置与 API 接入
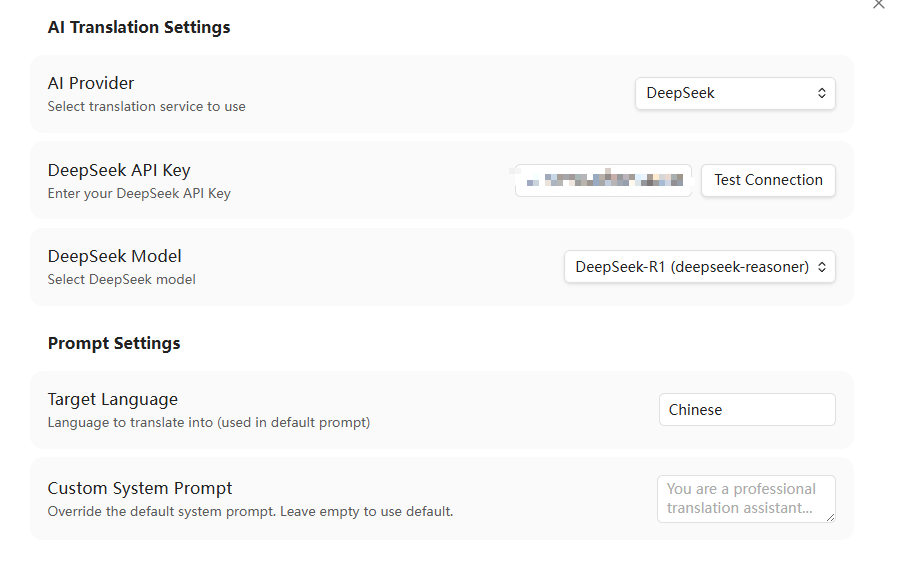
启用插件后,在 Obsidian **设置** -> **Obsidian - Translation** (或 **AI Translator**) 界面选择所需的翻译服务商并配置参数。
### 1. DeepSeek 配置
1. **AI Provider**: 选择 `DeepSeek`。
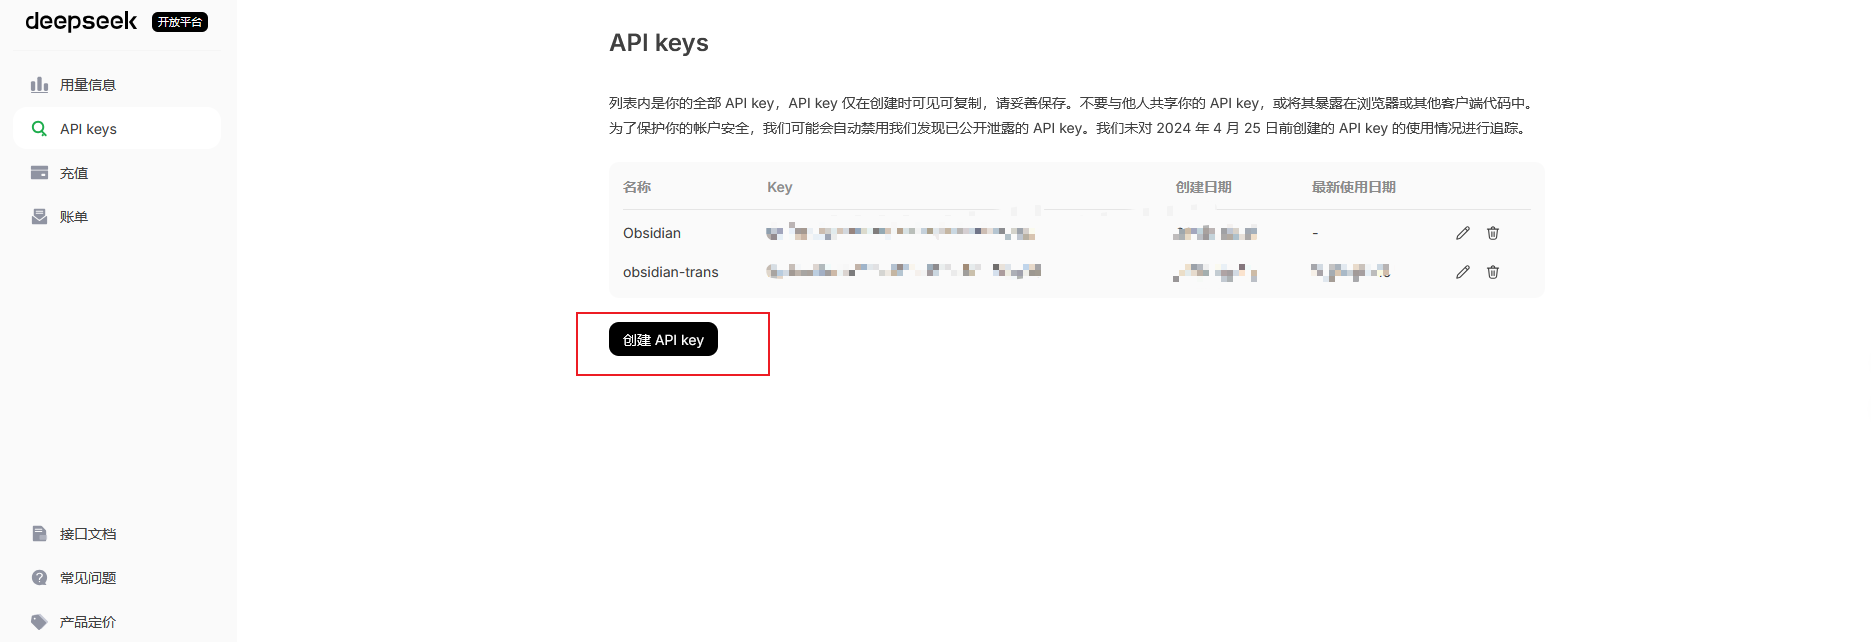
2. **API Key**: 输入您的 DeepSeek API Key(可在 [DeepSeek 开放平台](https://platform.deepseek.com/api_keys) 获取)。
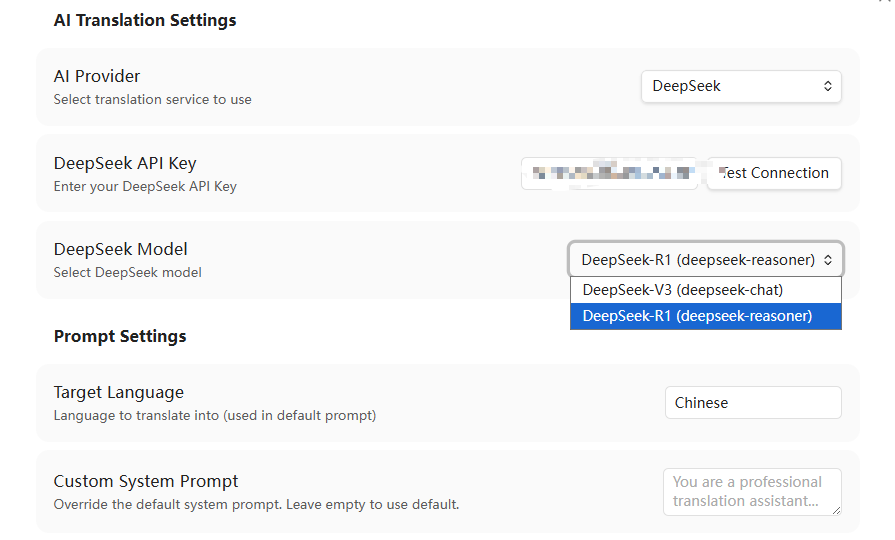
3. **Model**: 选择所需的预设模型(例如 `deepseek-chat`)。
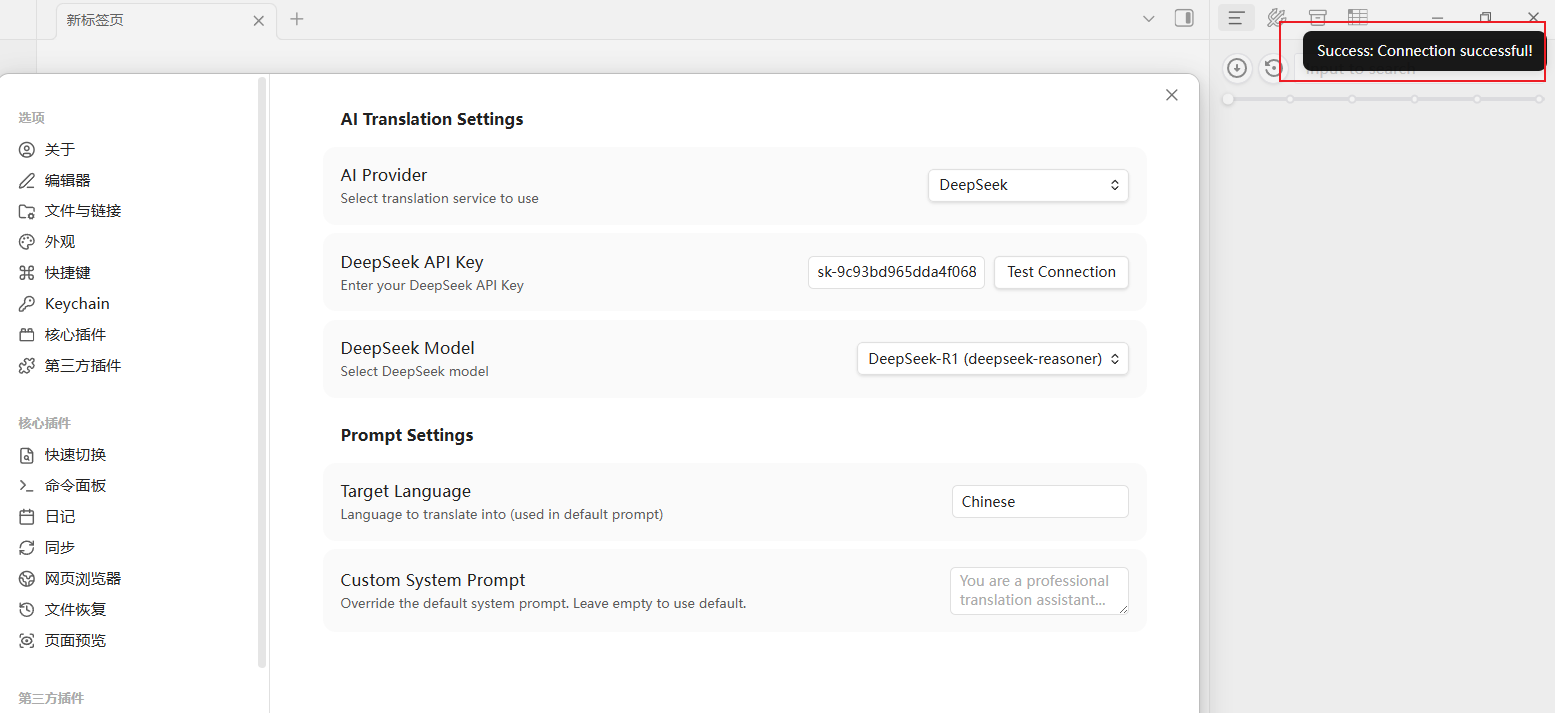
4. **测试连接**: 点击 **Test Connection** 按钮,若连接成功,会弹出 Success 提示。
### 2. 通义千问 (Qwen) 配置
1. **AI Provider**: 选择 `Tongyi Qianwen (Qwen)`。
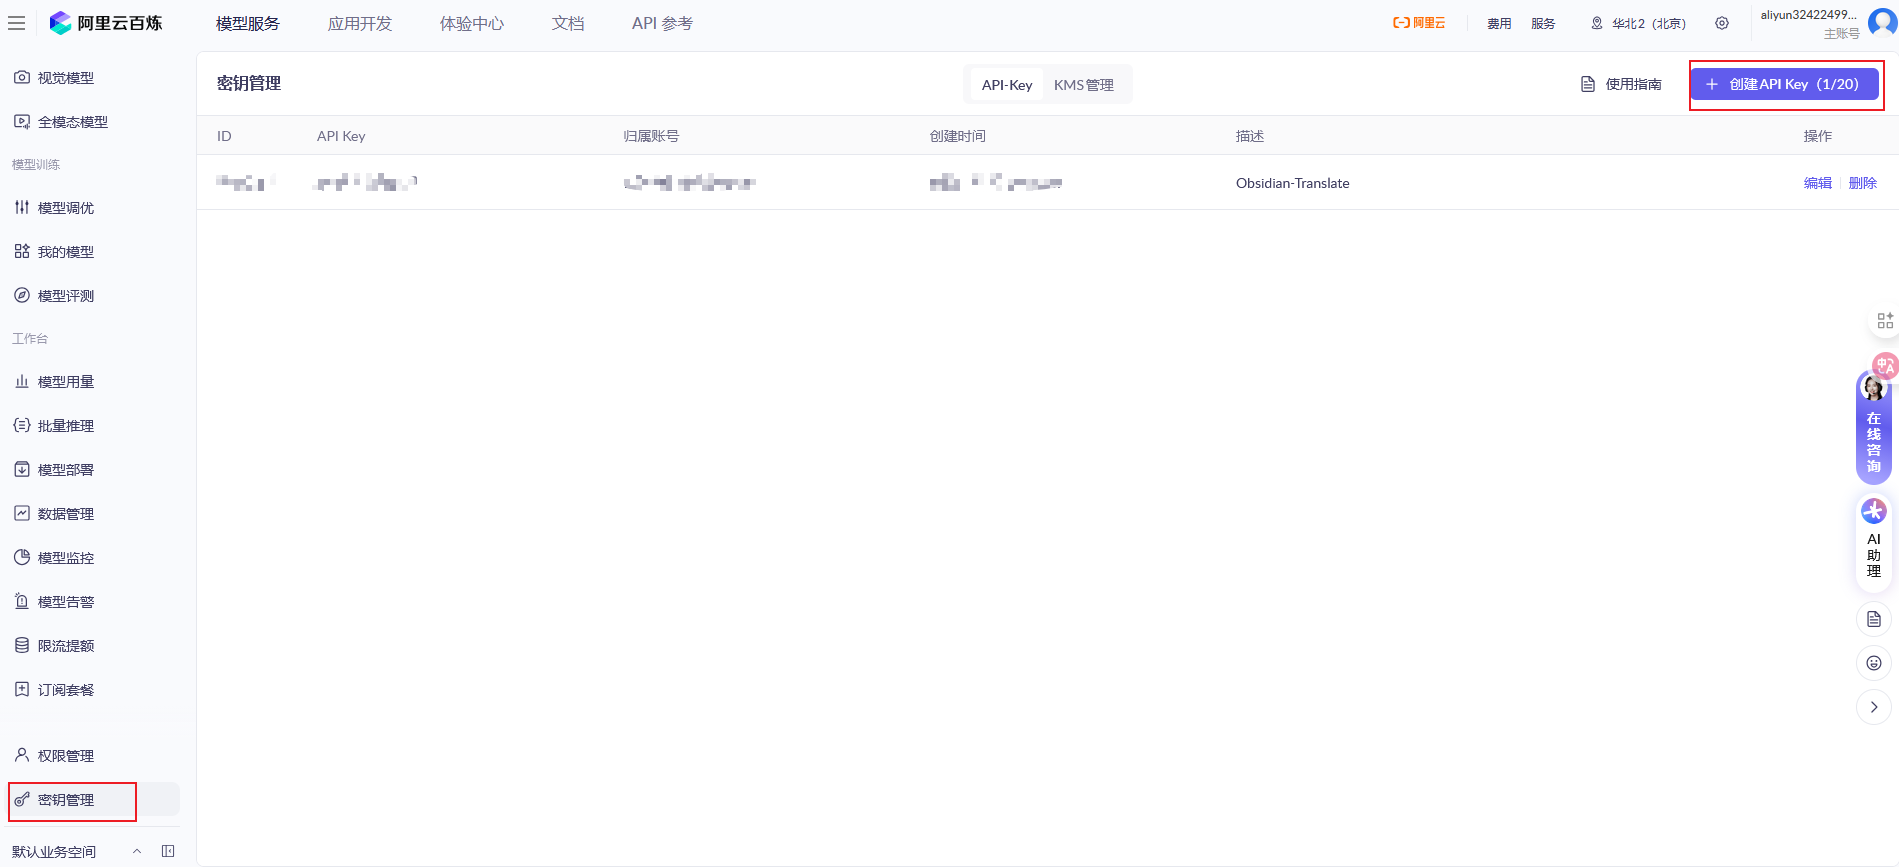
2. **API Key**: 输入阿里云 DashScope API Key(可在 [阿里云百炼平台](https://bailian.console.aliyun.com/cn-beijing/?spm=a2ty02.30260209.overview_recent.1.4f8f74a1kNTaRr&tab=model#/api-key) 获取)。
3. **Model**: 选择预设模型(如 `qwen-plus`)。
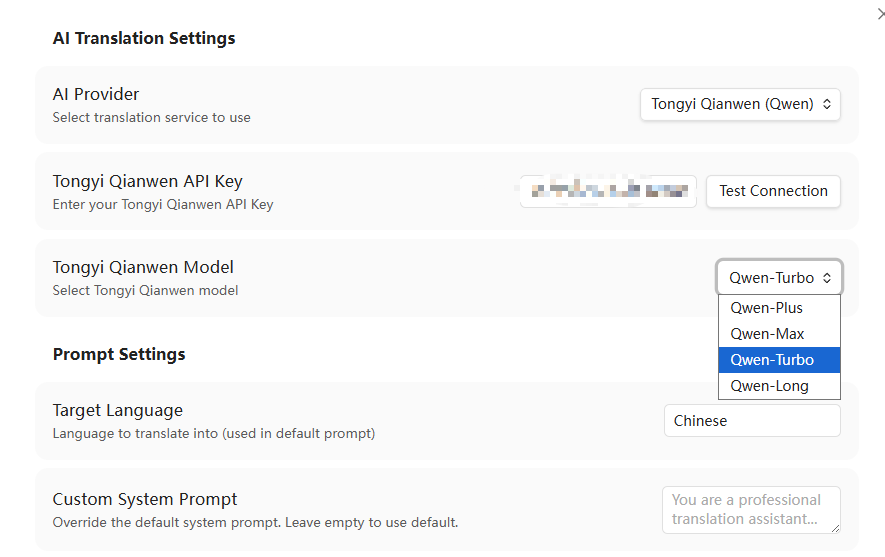
4. **测试连接**: 点击 **Test Connection** 验证接口可用性。
### 3. 豆包 (Doubao) 配置
1. **AI Provider**: 选择 `Doubao`。
2. **API Key**: 输入火山引擎方舟平台的 API Key。
3. **Model**: 填入在火山引擎控制台创建的 **终端节点 ID** (Endpoint ID,格式类似于 `ep-202406xxxxxxxxxx`)。
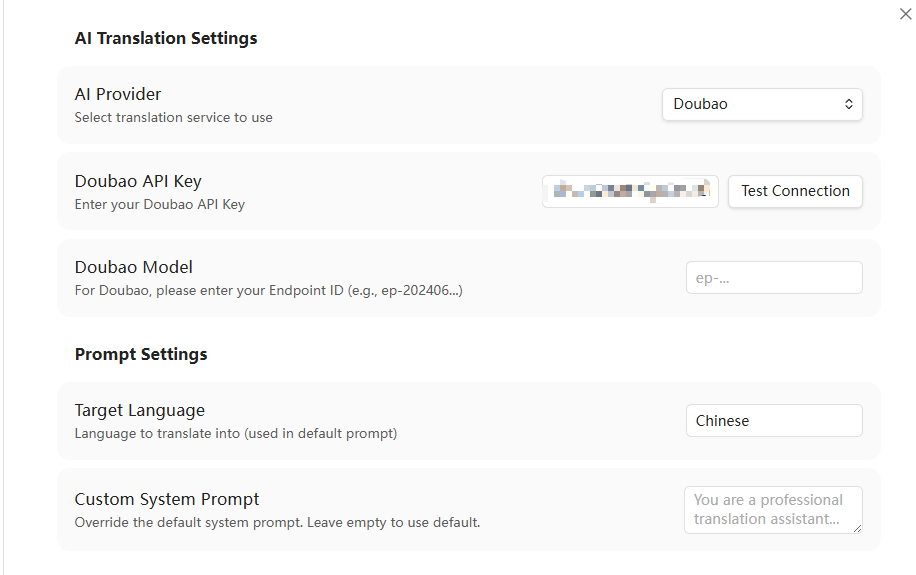
4. **测试连接**: 点击 **Test Connection** 验证可用性。
### 4. 其他预设大模型配置
对于以下预设模型,请输入对应的 API Key 并选择或指定模型:
- **OpenAI**: 支持 `gpt-4o`、`gpt-4o-mini` 等模型。
- **Anthropic Claude**: 支持 `claude-3-5-sonnet-latest` 等模型(支持 Claude 独有的 API 规范和系统提示词格式)。
- **Google Gemini**: 支持 `gemini-2.5-flash`、`gemini-2.5-pro` 等模型。
- **硅基流动 (SiliconFlow)**: 支持 `deepseek-ai/DeepSeek-V3`、`deepseek-ai/DeepSeek-R1` 等。
- **月之暗面 (Kimi)**: 支持 `moonshot-v1-8k` 等。
- **智谱清言 (GLM)**: 支持 `glm-4-flash` 等。
- **OpenRouter**: 支持多种聚合模型。
- **Groq**: 提供极速推理服务,支持 Llama 3.3 等。
### 5. 自定义接口 (Custom API) 配置示例
本插件支持任意兼容 OpenAI 规范的自定义接口(如本地部署的 Ollama 或第三方中转代理)。
#### 本地 Ollama 部署
- **AI Provider**: `Custom API (自定义 API)`
- **Custom API URL**: `http://localhost:11434/v1/chat/completions`
- **Custom API Key**: 留空
- **Custom Model ID**: `llama3`(或本地已下载的其他模型名称)
#### 第三方兼容代理
- **AI Provider**: `Custom API (自定义 API)`
- **Custom API URL**: 填写您的代理 API 完整端点地址(例如 `https://api.example.com/v1/chat/completions`)
- **Custom API Key**: 填写对应的 API 密钥
- **Custom Model ID**: 填写对应模型的 ID(如 `gpt-4o`)
---
## 🚀 使用方法
配置完成后,您可以通过以下任一方式使用翻译功能:
### 1. 右键菜单
1. 在 Obsidian 编辑器中选中需要翻译的文本。
2. 点击鼠标右键,在弹出的菜单中选择 **Translate Selection**。
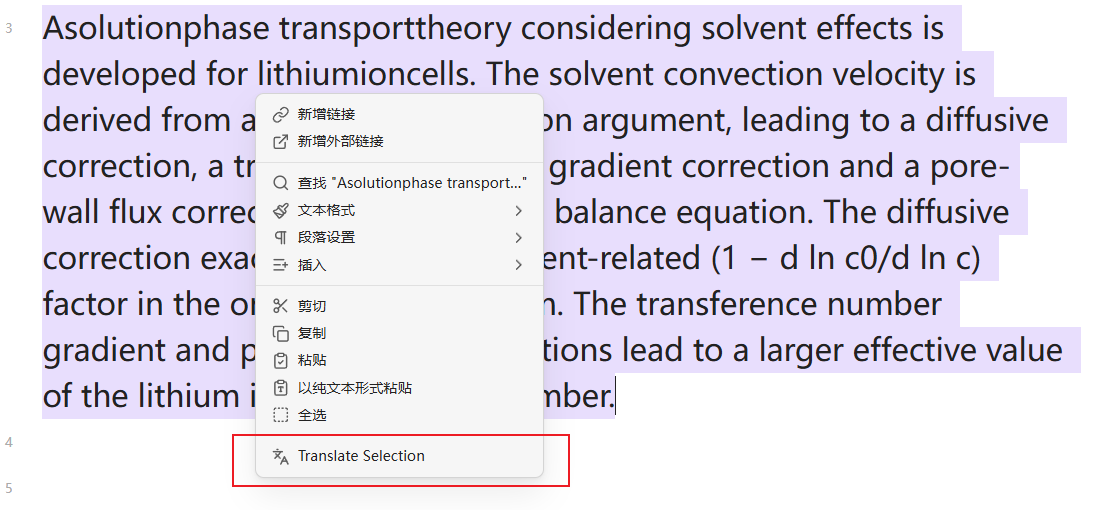
3. 状态栏将显示 “Translating...”,翻译完成后,结果会自动插入到选中文本的下方。
### 2. 命令面板
1. 选中需要翻译的文本。
2. 按下 `Ctrl/Cmd + P` 打开命令面板。
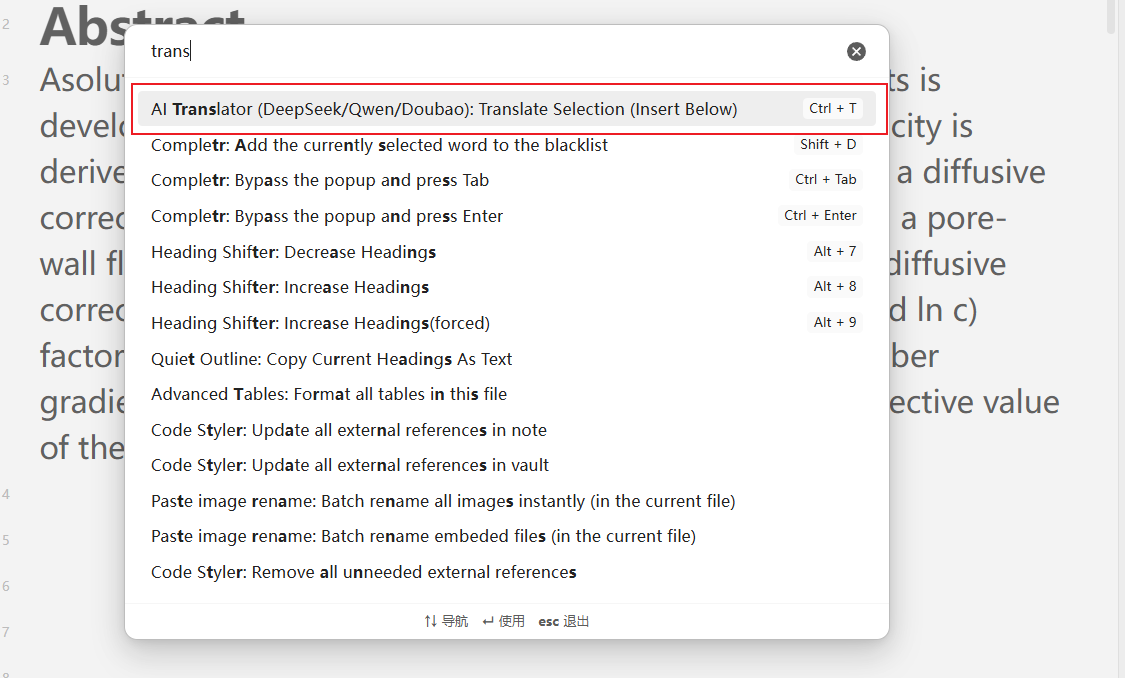
3. 输入 `Translate` 并选择 `Translator: Translate Selection (Insert Below)`。
### 3. 自定义快捷键
1. 进入 Obsidian **设置** -> **快捷键**。
2. 搜索 `Translate Selection`。
3. 为 `Translator: Translate Selection (Insert Below)` 命令设置一个快捷键(例如 `Ctrl + T`)。
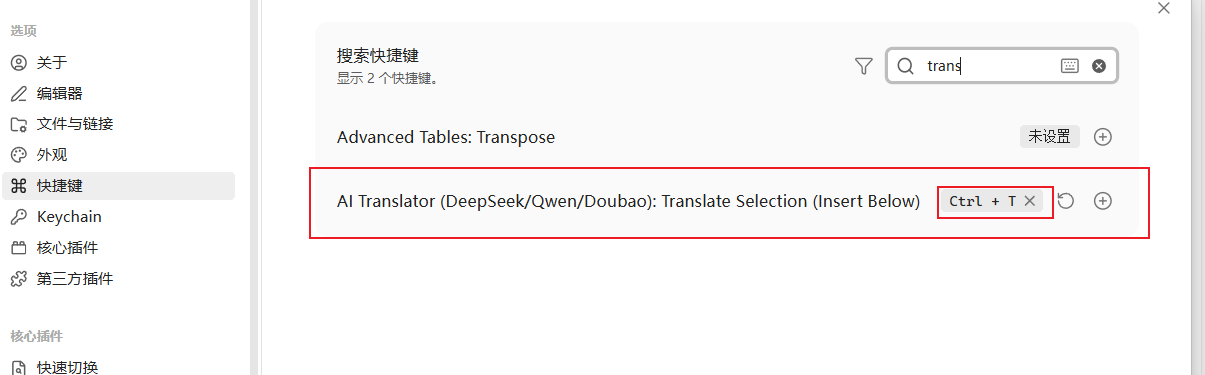
4. 选中文本后,按下设置的快捷键即可直接触发翻译。
---
## 🔧 进阶配置与疑难解答
### 修改目标语言
- 默认翻译目标语言为中文 (`Chinese`)。如需翻译成其他语言(如英文、日文等),请在插件设置的 **Target Language** 字段中直接修改(例如输入 `English`, `Japanese` 等)。
### 自定义系统提示词 (System Prompt)
- 您可以在 **Custom System Prompt** 输入框中填写专属的系统提示词,以改变翻译的语气或场景(如“请将以下文本翻译为严谨的学术中文,保持专业词汇准确”)。
- 当此输入框为空时,插件将默认使用内置的翻译提示词。输入框的 Placeholder 中会动态显示当前默认提示词的内容。
### 常见问题排查
若翻译失败,请检查以下内容:
1. **API Key**: 确保填写的 API Key 正确无误且未超出账单限额。
2. **网络连通性**: 确保您的网络能够正常请求对应服务商的 API 端点。
3. **火山引擎豆包**: 确认填写的 Model 字段是有效的 **终端节点 ID** (Endpoint ID),而不是模型通用名称。
4. **自定义端点**: 使用自定义 API 时,请确保填写的 URL 是包含路径的完整地址(例如必须以 `/chat/completions` 结尾)。