# Table Rollup
Table Rollup merges the Markdown tables from many notes into one table. You keep a small table under the same heading in each note, for example "Action items" in each meeting note. Table Rollup shows those rows together, with a link to the note that each row came from. Your data stays in your notes.
Table Rollup is a view for the core Bases plugin. The base selects the notes, and Table Rollup draws one merged table from their tables. It uses only the public Bases API for plugins.
 ## Features
### One table from many notes
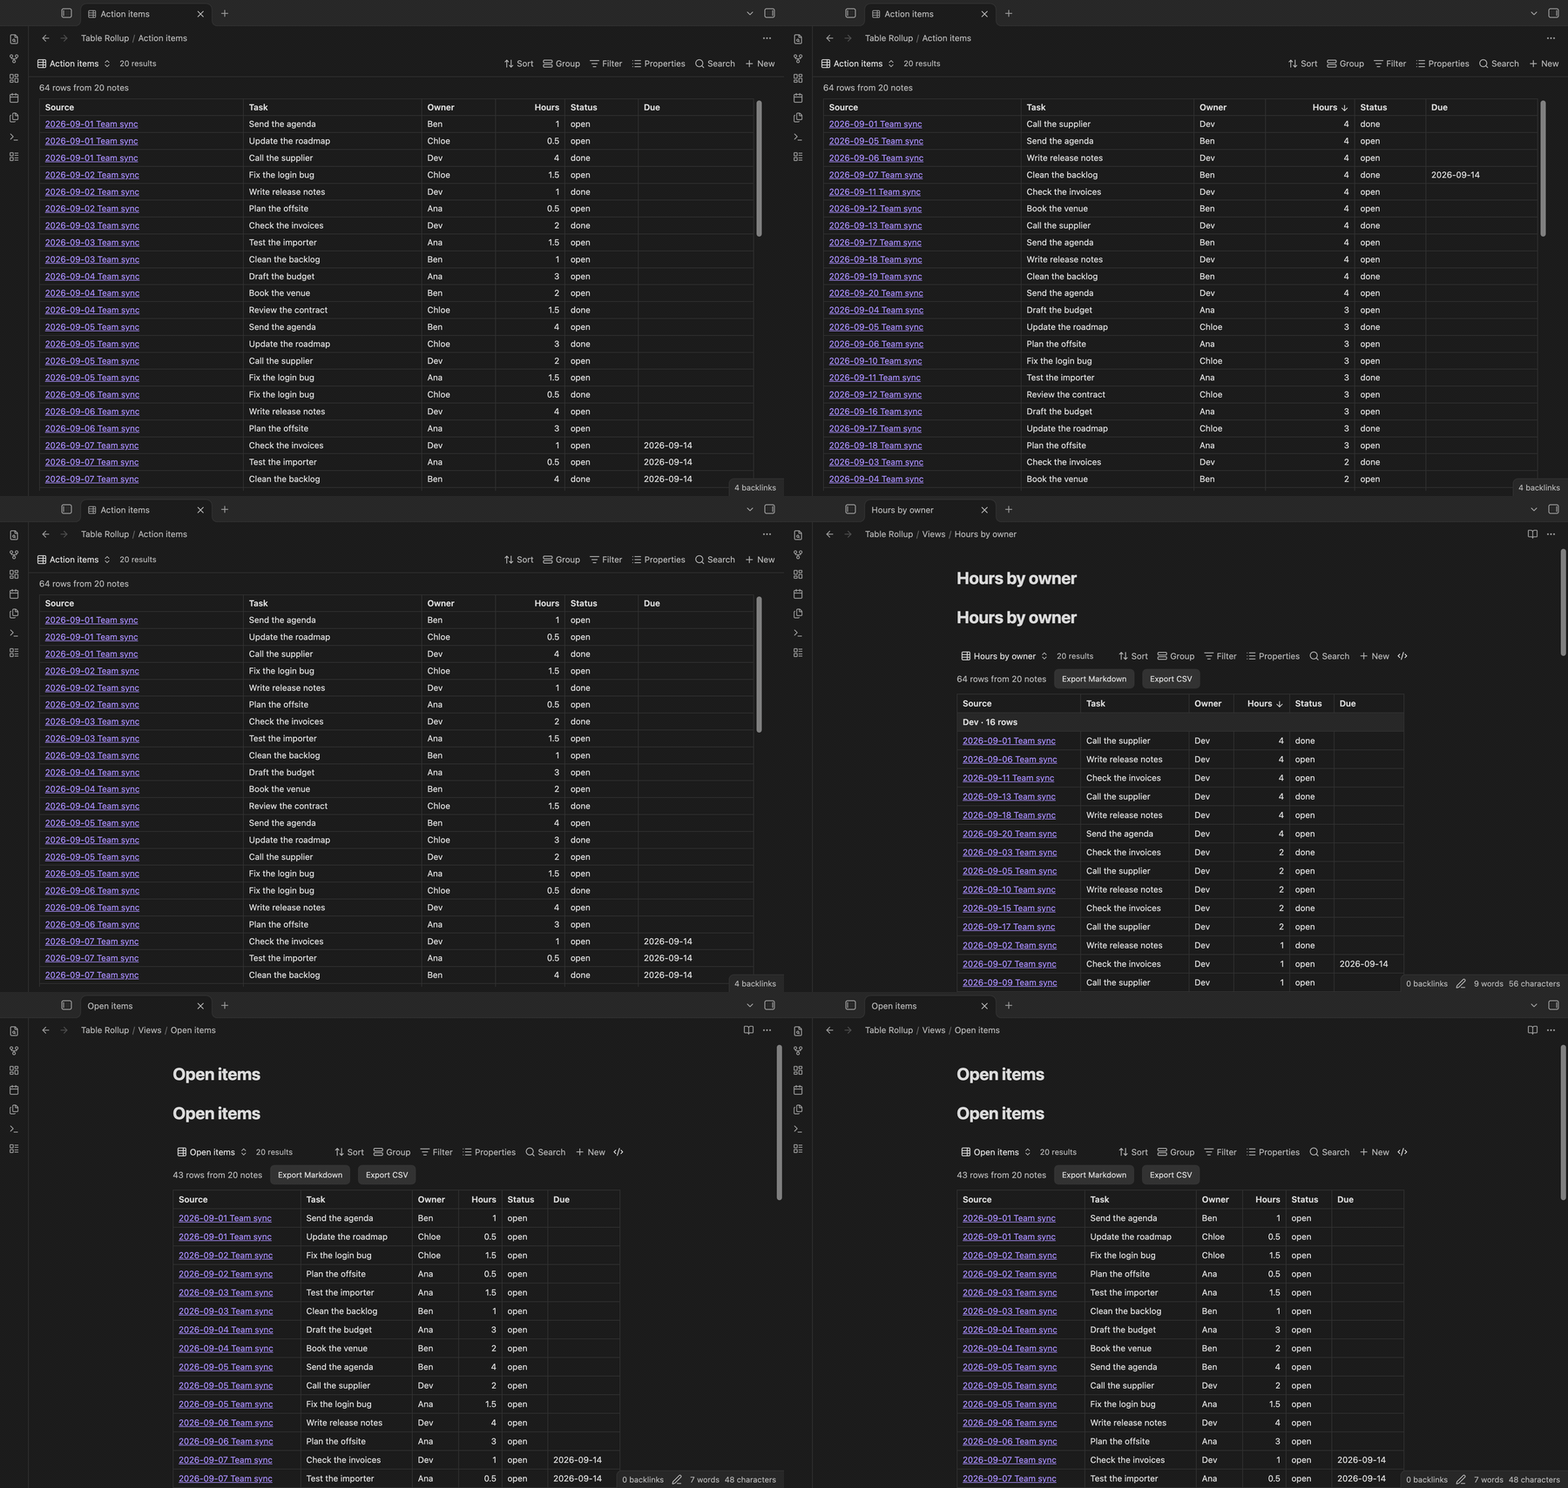
Each note in the base gives the rows of its table under the heading that you choose. The merged table matches the columns by name. Case, bold text and column order do not matter, so "Owner" and "owner" go into the same column. A column that only some notes have is added at the end. A Source column links to each note. Hover over the link to see a preview, or Ctrl-click (Cmd-click on macOS) to open the note in a new tab.
## Features
### One table from many notes
Each note in the base gives the rows of its table under the heading that you choose. The merged table matches the columns by name. Case, bold text and column order do not matter, so "Owner" and "owner" go into the same column. A column that only some notes have is added at the end. A Source column links to each note. Hover over the link to see a preview, or Ctrl-click (Cmd-click on macOS) to open the note in a new tab.
 ### Sort by any column
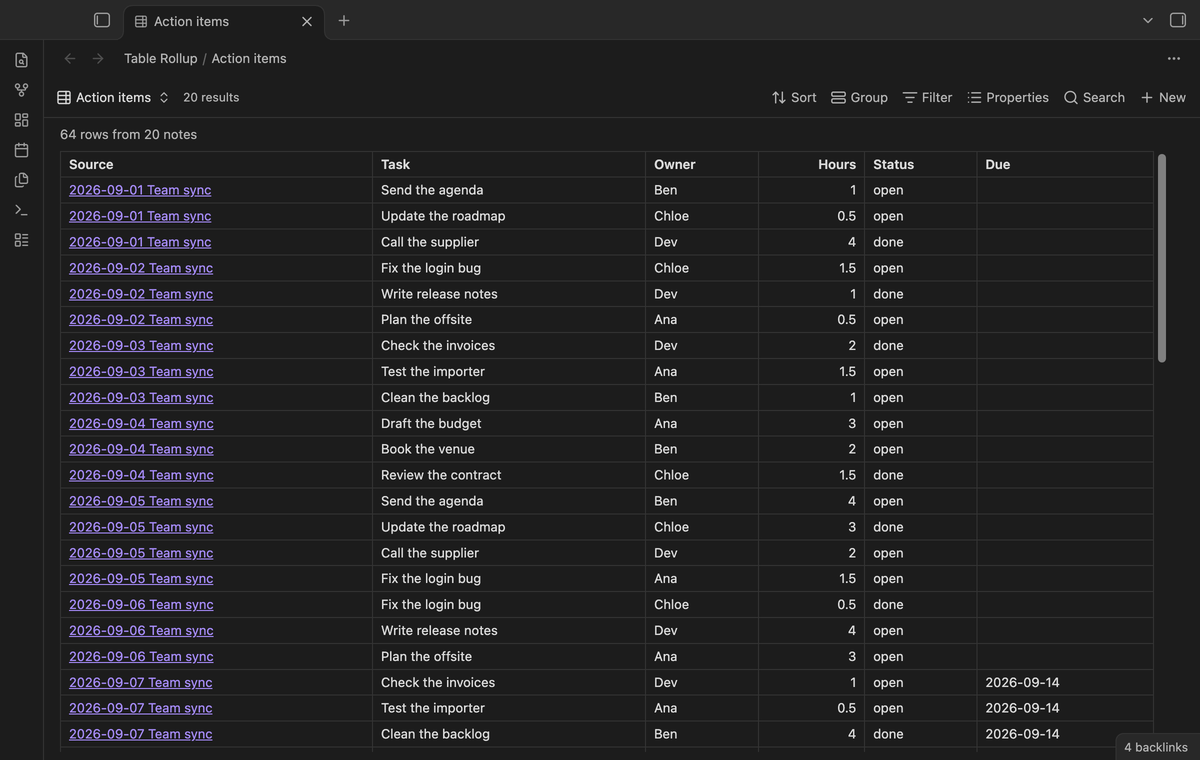
Click a column header to sort the rows. Click again to sort the other way, and a third time to go back to the note order. Numbers sort as numbers, and empty cells stay at the end.
### Sort by any column
Click a column header to sort the rows. Click again to sort the other way, and a third time to go back to the note order. Numbers sort as numbers, and empty cells stay at the end.
 ### Find rows
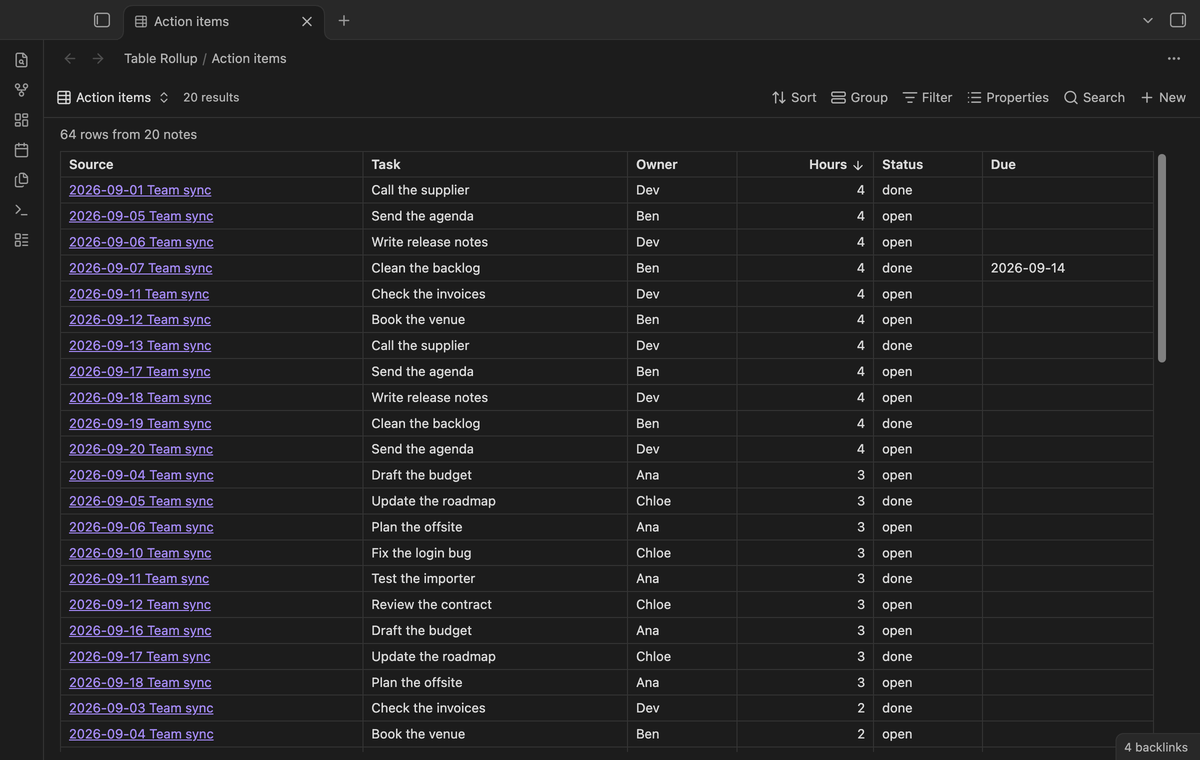
Type in the "Find rows" box above the table to keep only the rows whose cells or source note name hold that text. The match is case insensitive. The summary row and the group subtotals then add up only the rows that are left. Select the X button to show all rows again.
### Find rows
Type in the "Find rows" box above the table to keep only the rows whose cells or source note name hold that text. The match is case insensitive. The summary row and the group subtotals then add up only the rows that are left. Select the X button to show all rows again.
 ### Live update and embeds
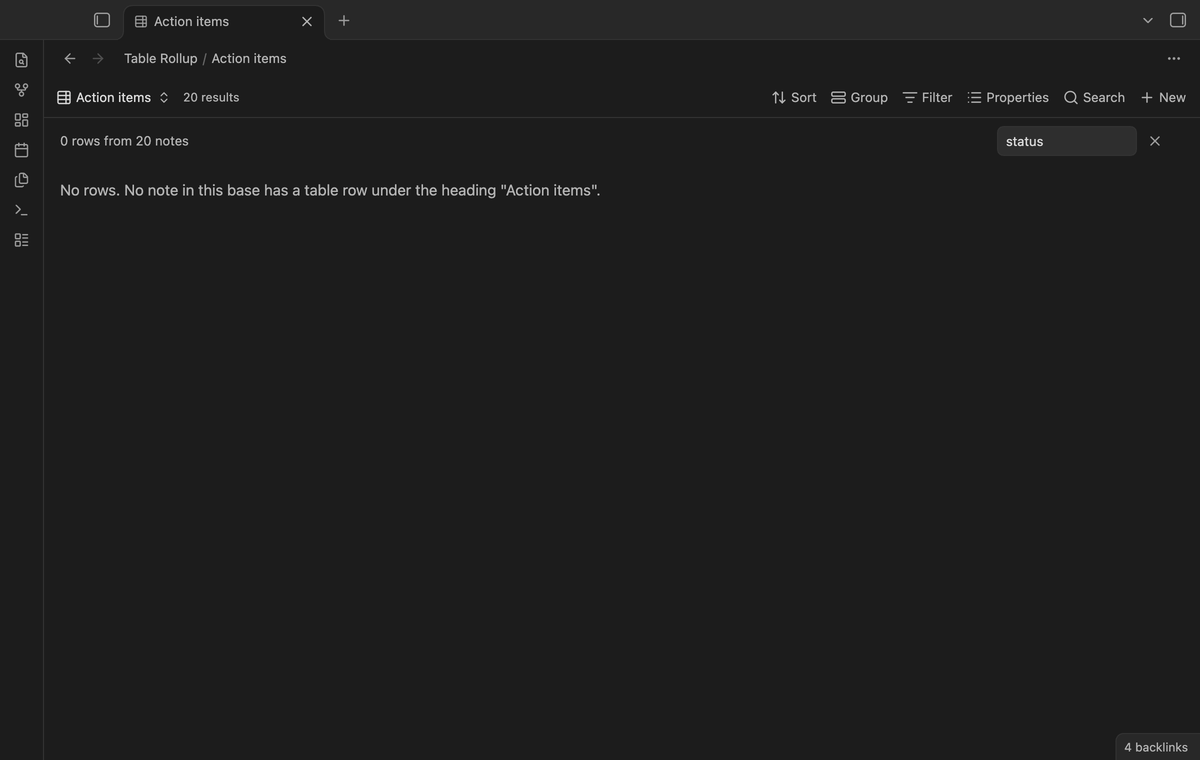
When you edit a source note, the merged table draws again after a short delay. You can embed the view in any note with `![[Your base.base#View name]]`, for example in a weekly review.
### Live update and embeds
When you edit a source note, the merged table draws again after a short delay. You can embed the view in any note with `![[Your base.base#View name]]`, for example in a weekly review.
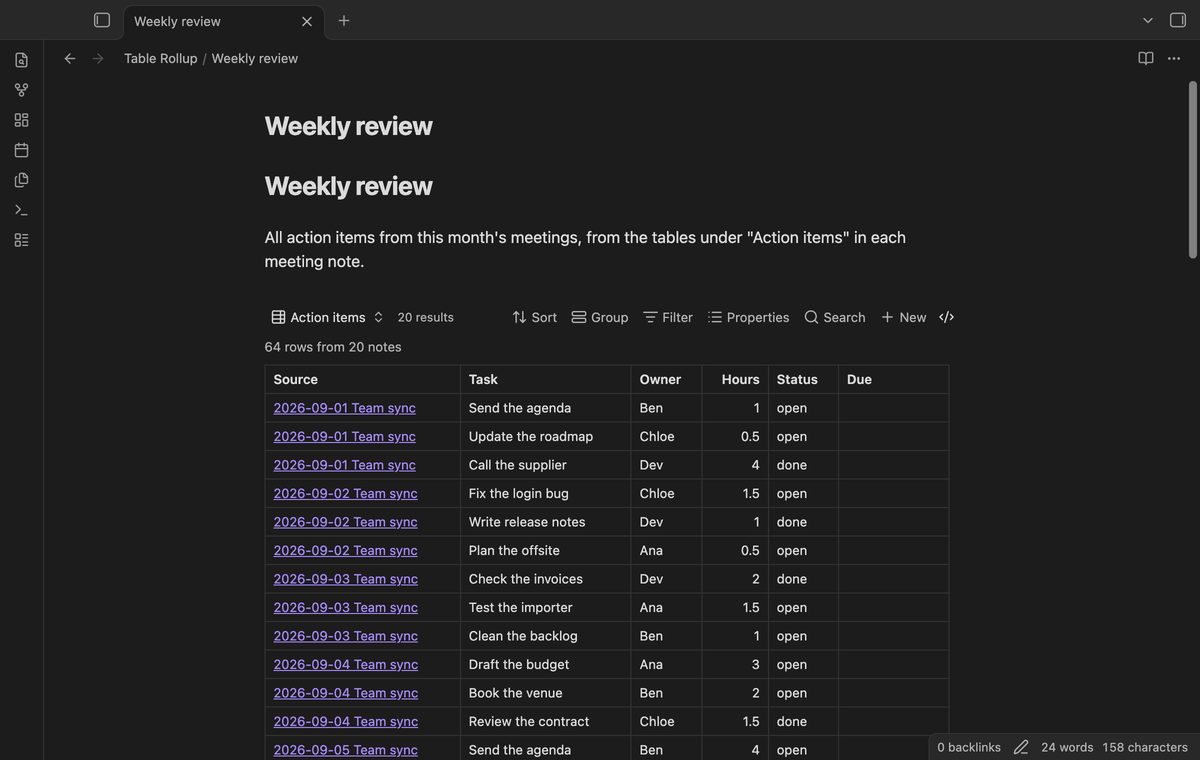 ### Summary rows and group subtotals (Pro)
Add a summary row with the sum, average, count, smallest or largest value of each column. Sum, average, min and max apply only to columns where every filled cell is a number. Values such as "$1,200.50" and "12 %" count as numbers. Group the rows by any column, or by Source, to get a subtotal for each group.
### Summary rows and group subtotals (Pro)
Add a summary row with the sum, average, count, smallest or largest value of each column. Sum, average, min and max apply only to columns where every filled cell is a number. Values such as "$1,200.50" and "12 %" count as numbers. Group the rows by any column, or by Source, to get a subtotal for each group.
 ### Filter rows (Pro)
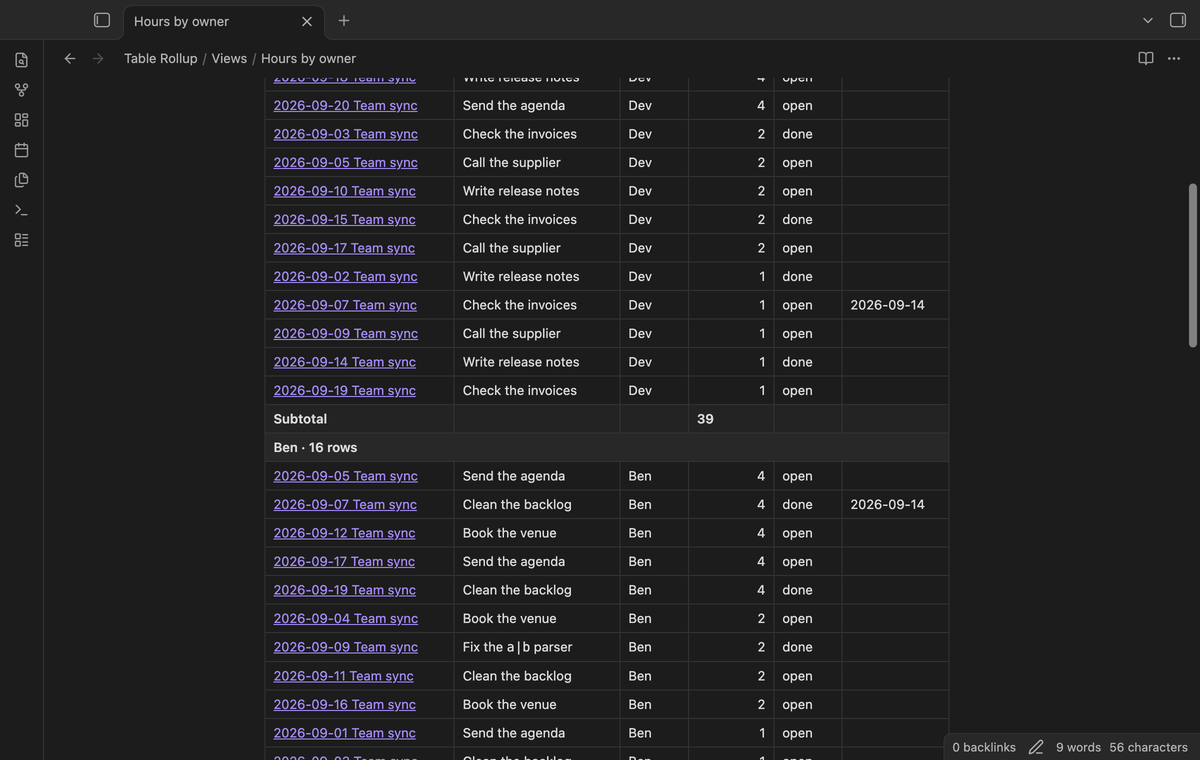
Keep only the rows where a column contains, equals or does not equal a value, or where a number is larger or smaller than a value. The summary row then adds up only the rows that are left.
### Filter rows (Pro)
Keep only the rows where a column contains, equals or does not equal a value, or where a number is larger or smaller than a value. The summary row then adds up only the rows that are left.
 ### Task list rollup (Pro)
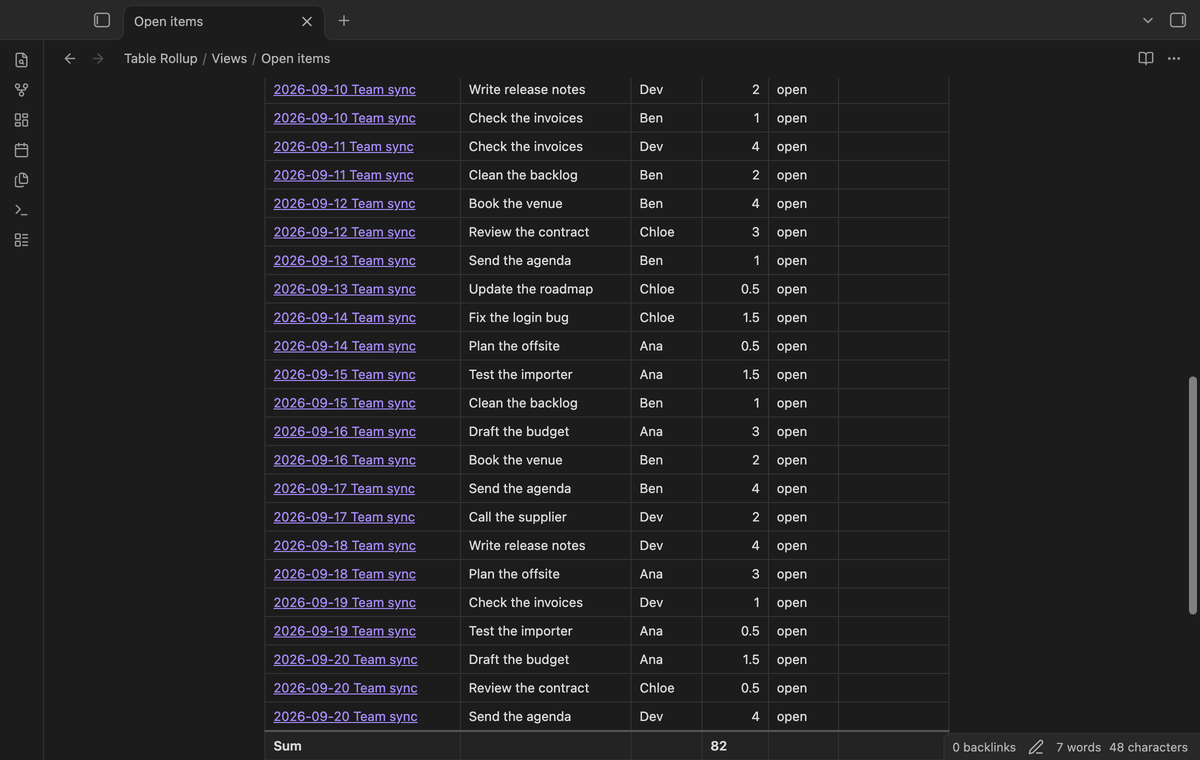
Set Read to Tasks to collect the task list items under a heading instead of a table. The merged table has the columns Task, Done and Due. Due comes from a date after the calendar emoji (U+1F4C5), the format that the Tasks plugin writes.
### Task list rollup (Pro)
Set Read to Tasks to collect the task list items under a heading instead of a table. The merged table has the columns Task, Done and Due. Due comes from a date after the calendar emoji (U+1F4C5), the format that the Tasks plugin writes.
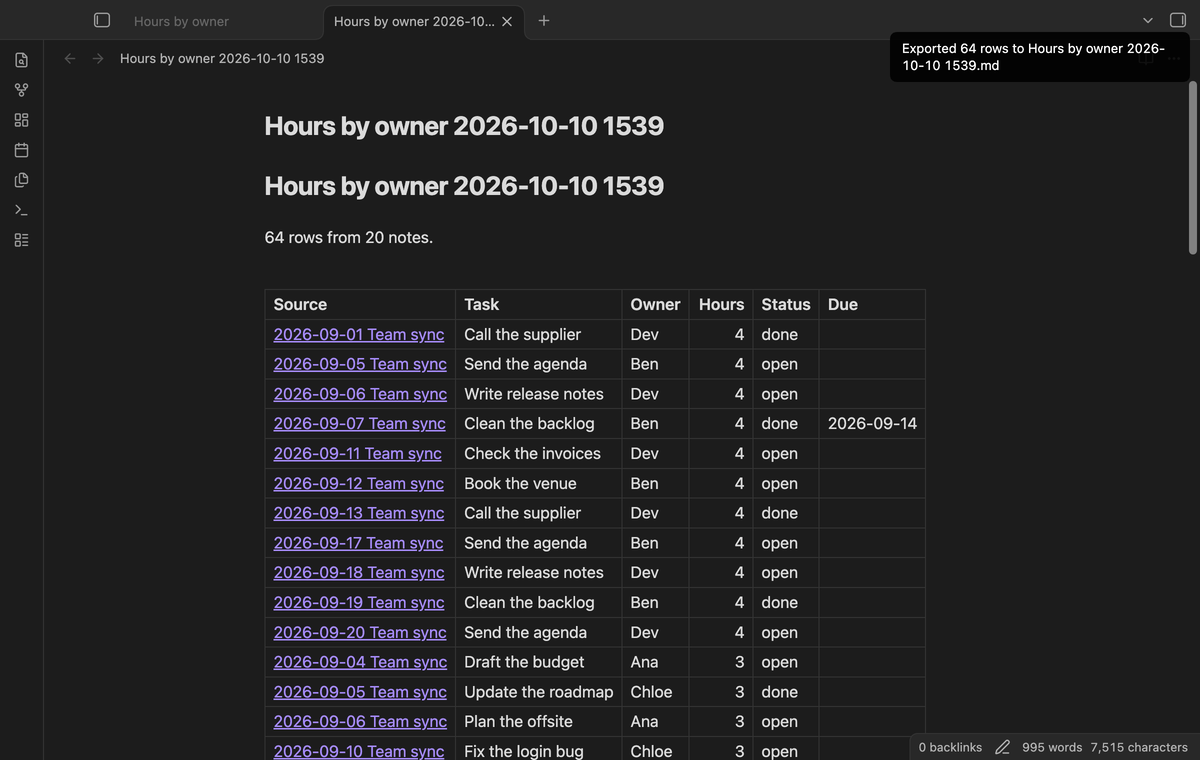
 ### Export to a note or CSV (Pro)
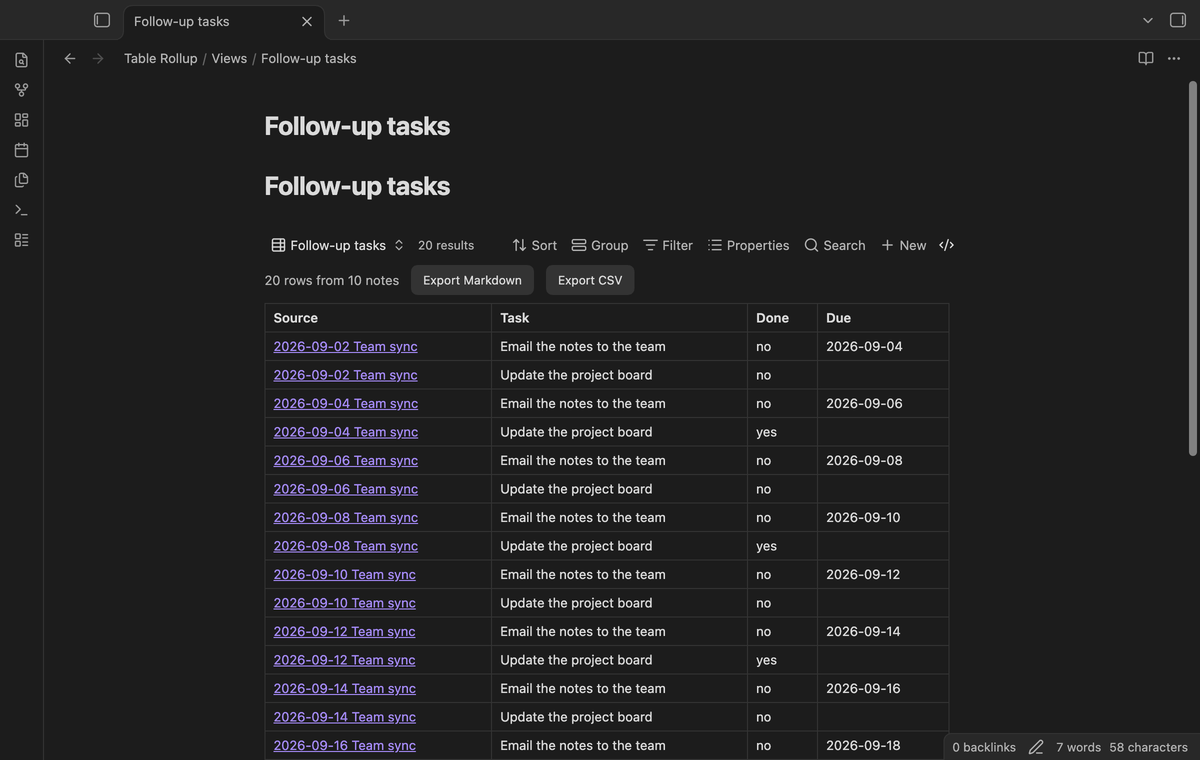
Export the merged table, with its filter and sort, to a new Markdown note or a CSV file. With the Source column on, each Markdown row links to its source note. A summary row, if set, ends the Markdown table, not the CSV file. Use the buttons above the table or the two export commands.
### Export to a note or CSV (Pro)
Export the merged table, with its filter and sort, to a new Markdown note or a CSV file. With the Source column on, each Markdown row links to its source note. A summary row, if set, ends the Markdown table, not the CSV file. Use the buttons above the table or the two export commands.
 ## Install
1. Open "Settings → Community plugins" and turn off restricted mode.
2. Select "Browse", search for "Table Rollup", then select "Install" and "Enable".
3. Make sure that the core plugin "Bases" is on ("Settings → Core plugins").
To install by hand, copy `main.js`, `manifest.json` and `styles.css` from the latest release into `/.obsidian/plugins/table-rollup/`. Then enable the plugin. You need Obsidian 1.13.4 or later.
## Usage
1. Create a base, or open one. Set its filters so that it selects the notes with your tables, for example a folder or a tag.
2. Select the view menu in the base toolbar and add a view of the type "Table rollup".
3. Open the view options. In "Under heading", type the heading above your tables, for example `Action items`.
Table Rollup uses the first table under that heading in each note, including tables in sub-sections. Leave "Under heading" empty to use the first table of each note. Tables in code blocks and in the front matter are ignored. Tables inside callouts and quotes are read.
The cells can hold links, tags, inline code, bold and italic text. A pipe inside inline code, inside a wikilink alias or written as `\|` stays in its cell.
## Pro
The free version merges the tables under one heading from up to 50 notes that have rows, with column sort, the find box, the Source column, embeds and live update. When more notes have rows, the table says how many it left out.
Pro removes the 50-note limit and adds summary rows, group subtotals, row filters, export to Markdown or CSV, and the task list rollup. To get it:
1. Sponsor [theluckystrike on GitHub Sponsors](https://github.com/sponsors/theluckystrike) with $5 a month, or $15 once. A total payment of $15 meets the payment requirement for Pro without further payment. Sign-in and the checks below still apply.
2. In Obsidian, open the settings of Table Rollup and select "Sign in with GitHub".
3. The plugin copies a code and opens github.com/login/device. Paste the code there and approve.
The status line then shows your GitHub login and the tier. If you sponsor after you sign in, select Refresh. A negative answer turns Pro off. Your view options stay saved in the base file and work again when Pro is on.
## Settings
The view options are in the base toolbar. They are saved with each view in the base file.
| Option | What it does |
| --- | --- |
| Read | Tables, or Tasks (Pro). |
| Under heading | The heading above the tables. Empty means any heading. |
| Which table | First, second, third or all tables under the heading. |
| Columns | Column names to show, in this order. Empty shows all columns. |
| Show source column | Shows or hides the Source column. |
| Find rows (box above the table) | Keeps only the rows that hold the text. |
| Summary row (Pro) | None, sum, average, count, min or max. |
| Group by column (Pro) | A column name, or Source. |
| Filter column, rule and value (Pro) | Keeps only the rows that match. |
The plugin settings tab has the Pro section (sign in with GitHub, status and Refresh) and one setting, "Live update delay": the time in milliseconds to wait after an edit before the tables draw again, from 100 to 2000. The default is 300.
## FAQ
### Does Table Rollup change my notes?
No. It only reads notes. Export creates a new file.
### How is this different from Dataview?
Dataview reads properties and inline fields, not Markdown tables.
### How is this different from SQLSeal and Block View?
SQLSeal reads a Markdown table, but you write one query line for each file and edit it when a new note joins. Block View lists matching blocks from many notes, but it shows each table on its own, without merged columns, column sort or totals.
### How fast is it?
In the end-to-end test with 500 notes and 2,000 rows, a full draw took 15 to 164 ms on an M3 Pro Mac.
## Payment, account and network
The core features are free. Pro features need a GitHub Sponsors sponsorship of theluckystrike: $5 a month or more, or $15 once. A total payment of $15 meets the payment requirement for Pro without further payment. Sign-in and the checks below still apply. Your notes stay readable and editable with or without Pro.
GitHub handles the payment. Sponsor at https://github.com/sponsors/theluckystrike. You need no account for the free features. Pro needs the GitHub account that sponsors.
Until you select "Sign in with GitHub" in the settings, Table Rollup makes no network requests. Sign in uses the GitHub device flow. Table Rollup sends its public client ID and the scope `read:user` to `https://github.com/login/device/code` and shows you a code. While you enter the code at https://github.com/login/device, it asks `https://github.com/login/oauth/access_token` every few seconds to check the sign-in status. The scope permits profile reads only. GitHub needs this access to show the sponsorship tier. It grants no repository scope and no write access.
After sign in, Table Rollup sends one query to `https://api.github.com/graphql`. It checks if the signed-in account sponsors theluckystrike. It asks for the tier and the total payment to theluckystrike. The plugin reuses a successful check for 7 days. Failed checks can retry after 6 hours. Select Refresh to request an earlier check. It sends no note content, file names or other vault data, and it has no telemetry.
After a successful check, Pro can work offline for up to 14 days. Sign out or a negative sponsorship answer turns Pro off. The plugin stores the GitHub token through the secret storage API of Obsidian. It does not put the token in its saved settings or its local sponsorship data. The local storage of this device keeps your GitHub login, the tier and the time of the last check. Sign out clears the token. You can also revoke the access in your GitHub settings, under Applications.
## Support
Report bugs and feature requests in this repository's GitHub issues. Add your Obsidian version and a small sample note.
## Install
1. Open "Settings → Community plugins" and turn off restricted mode.
2. Select "Browse", search for "Table Rollup", then select "Install" and "Enable".
3. Make sure that the core plugin "Bases" is on ("Settings → Core plugins").
To install by hand, copy `main.js`, `manifest.json` and `styles.css` from the latest release into `/.obsidian/plugins/table-rollup/`. Then enable the plugin. You need Obsidian 1.13.4 or later.
## Usage
1. Create a base, or open one. Set its filters so that it selects the notes with your tables, for example a folder or a tag.
2. Select the view menu in the base toolbar and add a view of the type "Table rollup".
3. Open the view options. In "Under heading", type the heading above your tables, for example `Action items`.
Table Rollup uses the first table under that heading in each note, including tables in sub-sections. Leave "Under heading" empty to use the first table of each note. Tables in code blocks and in the front matter are ignored. Tables inside callouts and quotes are read.
The cells can hold links, tags, inline code, bold and italic text. A pipe inside inline code, inside a wikilink alias or written as `\|` stays in its cell.
## Pro
The free version merges the tables under one heading from up to 50 notes that have rows, with column sort, the find box, the Source column, embeds and live update. When more notes have rows, the table says how many it left out.
Pro removes the 50-note limit and adds summary rows, group subtotals, row filters, export to Markdown or CSV, and the task list rollup. To get it:
1. Sponsor [theluckystrike on GitHub Sponsors](https://github.com/sponsors/theluckystrike) with $5 a month, or $15 once. A total payment of $15 meets the payment requirement for Pro without further payment. Sign-in and the checks below still apply.
2. In Obsidian, open the settings of Table Rollup and select "Sign in with GitHub".
3. The plugin copies a code and opens github.com/login/device. Paste the code there and approve.
The status line then shows your GitHub login and the tier. If you sponsor after you sign in, select Refresh. A negative answer turns Pro off. Your view options stay saved in the base file and work again when Pro is on.
## Settings
The view options are in the base toolbar. They are saved with each view in the base file.
| Option | What it does |
| --- | --- |
| Read | Tables, or Tasks (Pro). |
| Under heading | The heading above the tables. Empty means any heading. |
| Which table | First, second, third or all tables under the heading. |
| Columns | Column names to show, in this order. Empty shows all columns. |
| Show source column | Shows or hides the Source column. |
| Find rows (box above the table) | Keeps only the rows that hold the text. |
| Summary row (Pro) | None, sum, average, count, min or max. |
| Group by column (Pro) | A column name, or Source. |
| Filter column, rule and value (Pro) | Keeps only the rows that match. |
The plugin settings tab has the Pro section (sign in with GitHub, status and Refresh) and one setting, "Live update delay": the time in milliseconds to wait after an edit before the tables draw again, from 100 to 2000. The default is 300.
## FAQ
### Does Table Rollup change my notes?
No. It only reads notes. Export creates a new file.
### How is this different from Dataview?
Dataview reads properties and inline fields, not Markdown tables.
### How is this different from SQLSeal and Block View?
SQLSeal reads a Markdown table, but you write one query line for each file and edit it when a new note joins. Block View lists matching blocks from many notes, but it shows each table on its own, without merged columns, column sort or totals.
### How fast is it?
In the end-to-end test with 500 notes and 2,000 rows, a full draw took 15 to 164 ms on an M3 Pro Mac.
## Payment, account and network
The core features are free. Pro features need a GitHub Sponsors sponsorship of theluckystrike: $5 a month or more, or $15 once. A total payment of $15 meets the payment requirement for Pro without further payment. Sign-in and the checks below still apply. Your notes stay readable and editable with or without Pro.
GitHub handles the payment. Sponsor at https://github.com/sponsors/theluckystrike. You need no account for the free features. Pro needs the GitHub account that sponsors.
Until you select "Sign in with GitHub" in the settings, Table Rollup makes no network requests. Sign in uses the GitHub device flow. Table Rollup sends its public client ID and the scope `read:user` to `https://github.com/login/device/code` and shows you a code. While you enter the code at https://github.com/login/device, it asks `https://github.com/login/oauth/access_token` every few seconds to check the sign-in status. The scope permits profile reads only. GitHub needs this access to show the sponsorship tier. It grants no repository scope and no write access.
After sign in, Table Rollup sends one query to `https://api.github.com/graphql`. It checks if the signed-in account sponsors theluckystrike. It asks for the tier and the total payment to theluckystrike. The plugin reuses a successful check for 7 days. Failed checks can retry after 6 hours. Select Refresh to request an earlier check. It sends no note content, file names or other vault data, and it has no telemetry.
After a successful check, Pro can work offline for up to 14 days. Sign out or a negative sponsorship answer turns Pro off. The plugin stores the GitHub token through the secret storage API of Obsidian. It does not put the token in its saved settings or its local sponsorship data. The local storage of this device keeps your GitHub login, the tier and the time of the last check. Sign out clears the token. You can also revoke the access in your GitHub settings, under Applications.
## Support
Report bugs and feature requests in this repository's GitHub issues. Add your Obsidian version and a small sample note.