# Notion Selection Toolbar
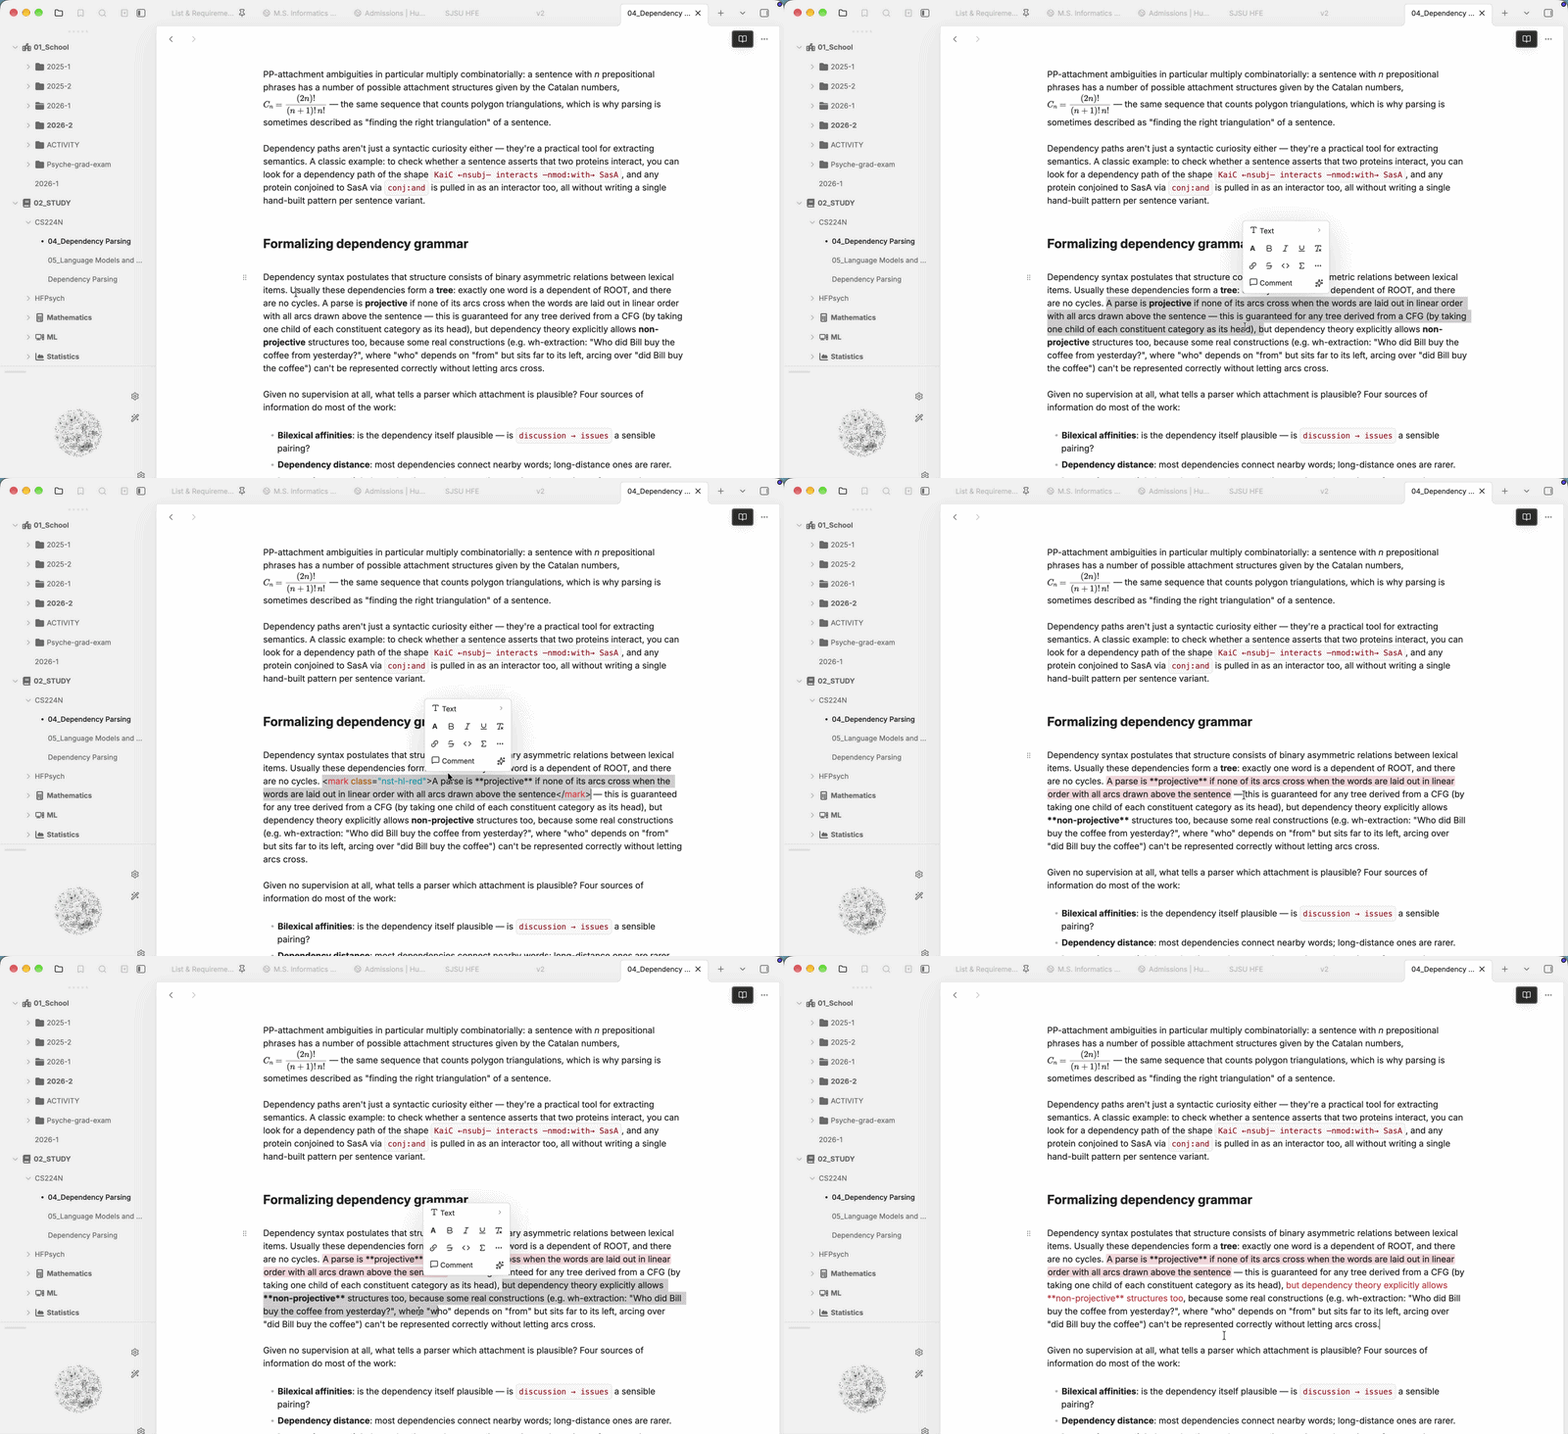
A Notion-style floating toolbar for [Obsidian](https://obsidian.md). Select some text and a toolbar pops up above it. From there you can change the block type, color the text or highlight it, and apply inline formatting without typing any Markdown.
If you like it, [](https://buymeacoffee.com/jiwooroh)
## How to use
1. Open a note in **editing mode** (Live Preview or Source mode). The toolbar doesn't appear in Reading view.
2. **Select text** with the mouse or keyboard. The toolbar appears just above the selection, or below it if there's no room above.
3. Click a button to apply it. The selection stays in place, so you can stack several actions, for example a color, then bold, then italic.
4. Press **Esc** or click elsewhere to close the toolbar or any open menu.
### Toolbar layout
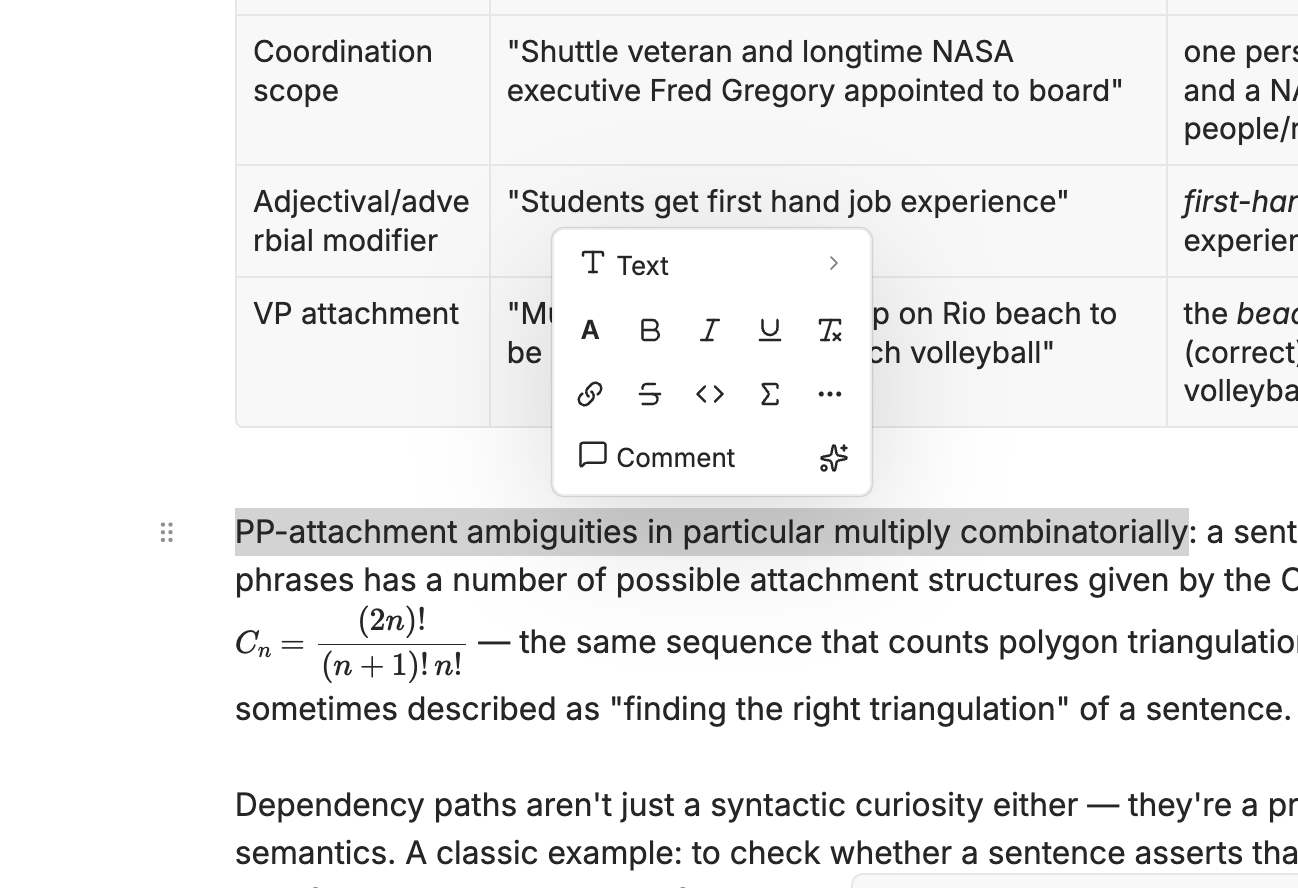
```
┌──────────────────────────────┐
│ ¶ Text › │ Turn into (block type)
│ A B I U ⌫ │ Color · Bold · Italic · Underline · Clear formatting
│ 🔗 S̶ <> Σ ⋯ │ Link · Strikethrough · Inline code · Inline equation · More
│ 💬 Comment ✨ │ Comment · Custom button
└──────────────────────────────┘
```
 ### Turn into (block type)
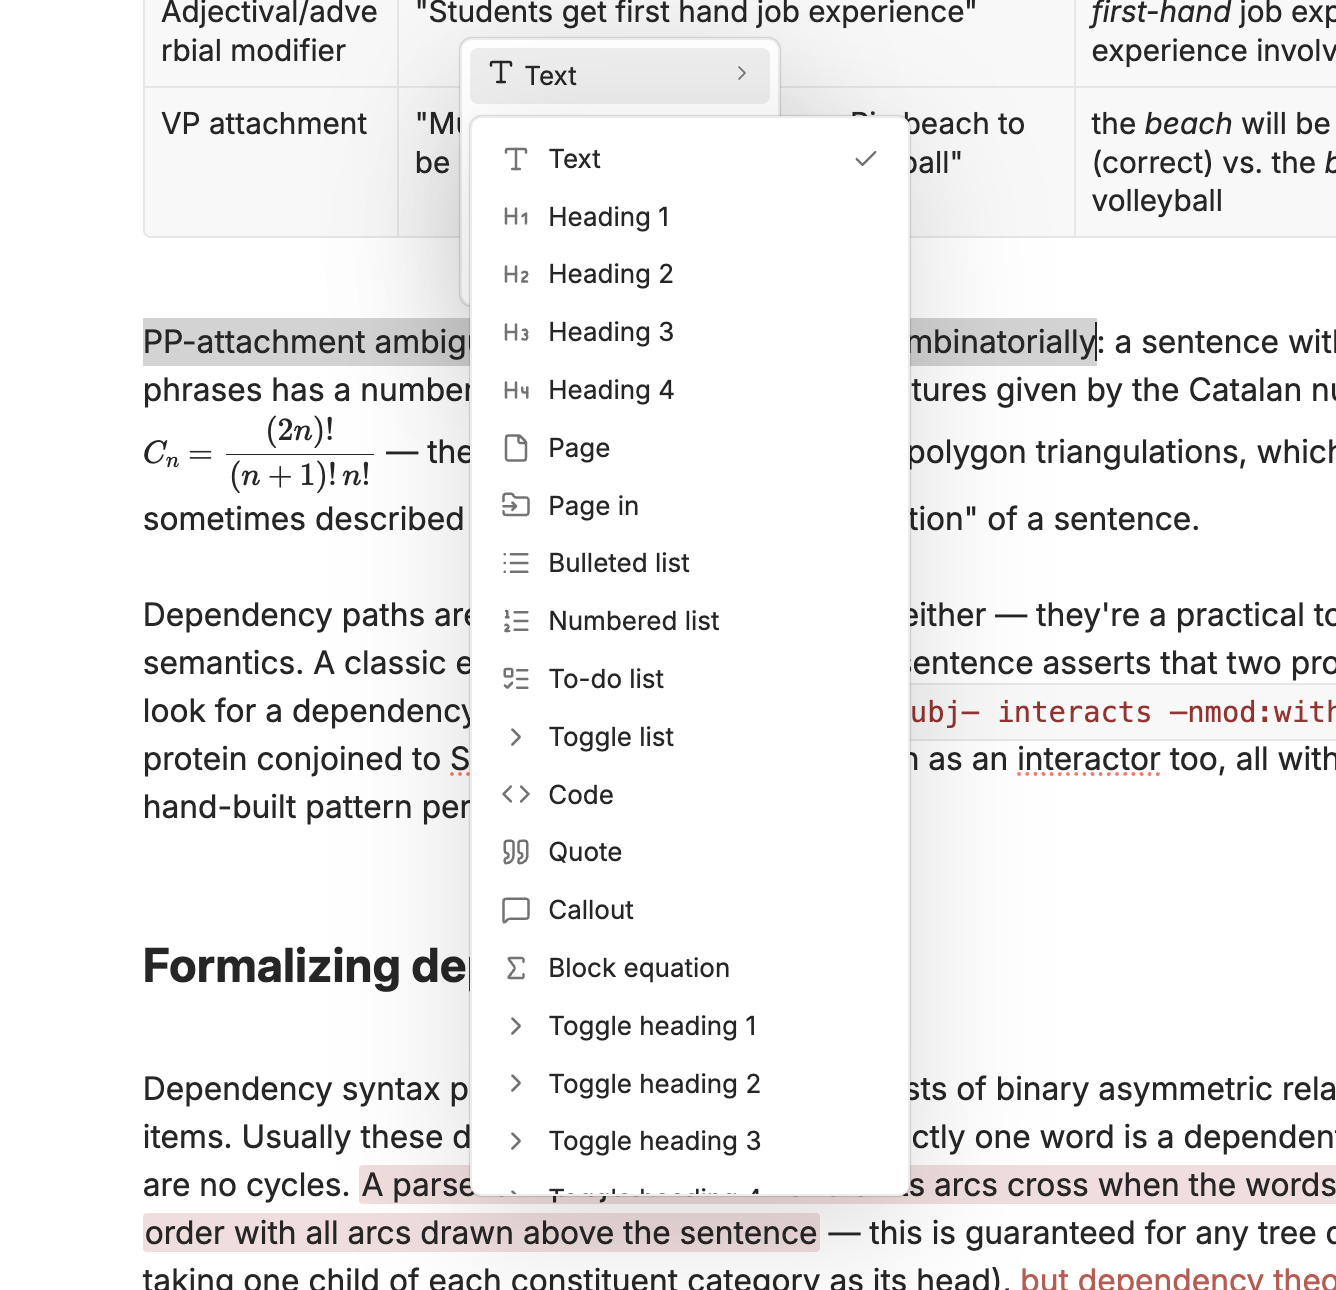
The top button shows the current line's block type (e.g. `Heading 2`). Click it to convert the selected line or lines:
### Turn into (block type)
The top button shows the current line's block type (e.g. `Heading 2`). Click it to convert the selected line or lines:
 | Menu item | Result |
| --- | --- |
| Text | Removes the heading, list, quote or callout marker |
| Heading 1–4 | `#` … `####` |
| Bulleted / Numbered / To-do list | `- `, `1. `, `- [ ] ` (renumbered automatically when you select several lines) |
| Quote | `> ` |
| Callout | Opens a submenu of Obsidian callout types (Note, Info, Tip, Warning, Danger, Bug, …) → `> [!type]` |
| Code | Wraps the lines in a ```` ``` ```` code block |
| Block equation | Wraps the lines in a `$$` math block |
| Toggle list / Toggle heading 1–4 | A collapsible `
| Menu item | Result |
| --- | --- |
| Text | Removes the heading, list, quote or callout marker |
| Heading 1–4 | `#` … `####` |
| Bulleted / Numbered / To-do list | `- `, `1. `, `- [ ] ` (renumbered automatically when you select several lines) |
| Quote | `> ` |
| Callout | Opens a submenu of Obsidian callout types (Note, Info, Tip, Warning, Danger, Bug, …) → `> [!type]` |
| Code | Wraps the lines in a ```` ``` ```` code block |
| Block equation | Wraps the lines in a `$$` math block |
| Toggle list / Toggle heading 1–4 | A collapsible `` block. The selected text becomes the summary, and you type the hidden content on the next line |
| 2 columns | A two-column layout. The selected content goes in the left column |
| **Page** | Moves the selection into a new note in the same folder and leaves a `[[wikilink]]` in its place. The first line of the selection becomes the note's title |
| **Page in** | Same as Page, but first asks which folder to create the note in |
### Colors
Click **A** to open the color panel:
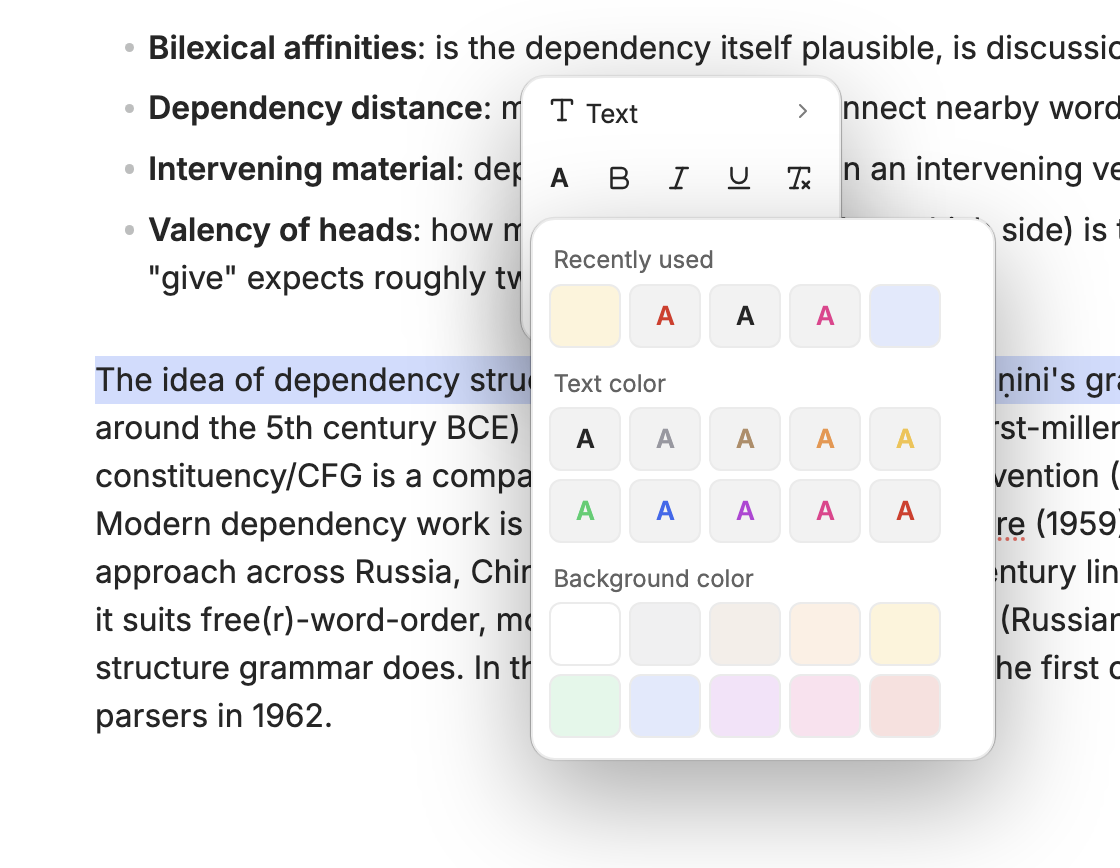 - **Text color**: 9 Notion colors (gray, brown, orange, yellow, green, blue, purple, pink, red)
- **Background color**: the same 9 colors as highlights
- **Default**: removes the color from the selection
- **Recently used**: your last 5 colors
- **Text color**: 9 Notion colors (gray, brown, orange, yellow, green, blue, purple, pink, red)
- **Background color**: the same 9 colors as highlights
- **Default**: removes the color from the selection
- **Recently used**: your last 5 colors
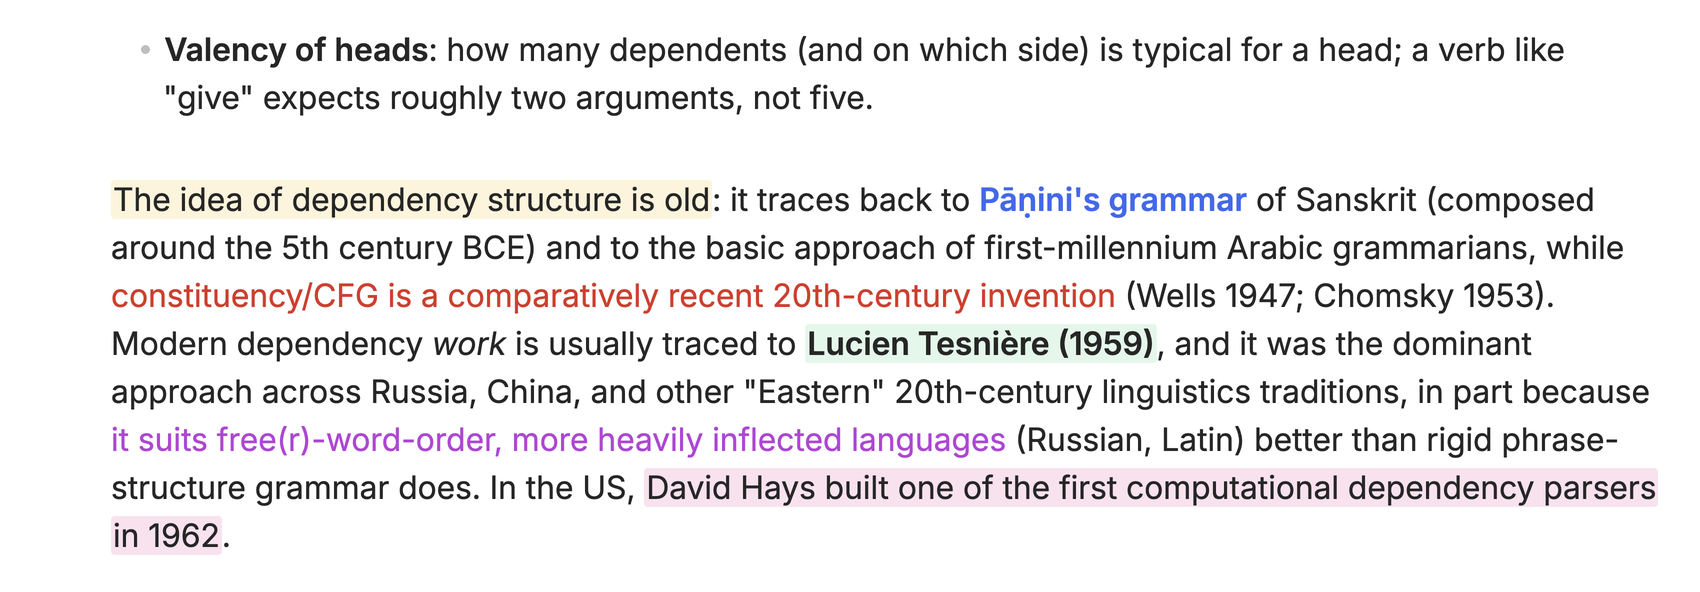 Press **Cmd/Ctrl + Shift + H** to apply your most recently used color to the selection without opening the toolbar.
While the plugin is enabled, Obsidian's **Cmd/Ctrl + H** (Toggle highlight) applies the plugin's yellow highlight instead of `==text==`, and removes it when pressed again. Text that already has a text color keeps it.
Colors follow your theme: applied colors switch automatically between light and dark mode.
In the Notion scheme, bold colored text uses a slightly deeper bold variant of its color. Bold, italic, strikethrough and code applied to colored or highlighted text are written inside the color tag as HTML (e.g. `text`) so they render in Live Preview as well as Reading view. Obsidian's own **Cmd/Ctrl + B** and **Cmd/Ctrl + I** do the same when the selection is colored or highlighted text.
There are two color schemes, chosen under **Settings → Color scheme**. Switching recolors colors already in your notes; the notes themselves don't change.
Press **Cmd/Ctrl + Shift + H** to apply your most recently used color to the selection without opening the toolbar.
While the plugin is enabled, Obsidian's **Cmd/Ctrl + H** (Toggle highlight) applies the plugin's yellow highlight instead of `==text==`, and removes it when pressed again. Text that already has a text color keeps it.
Colors follow your theme: applied colors switch automatically between light and dark mode.
In the Notion scheme, bold colored text uses a slightly deeper bold variant of its color. Bold, italic, strikethrough and code applied to colored or highlighted text are written inside the color tag as HTML (e.g. `text`) so they render in Live Preview as well as Reading view. Obsidian's own **Cmd/Ctrl + B** and **Cmd/Ctrl + I** do the same when the selection is colored or highlighted text.
There are two color schemes, chosen under **Settings → Color scheme**. Switching recolors colors already in your notes; the notes themselves don't change.
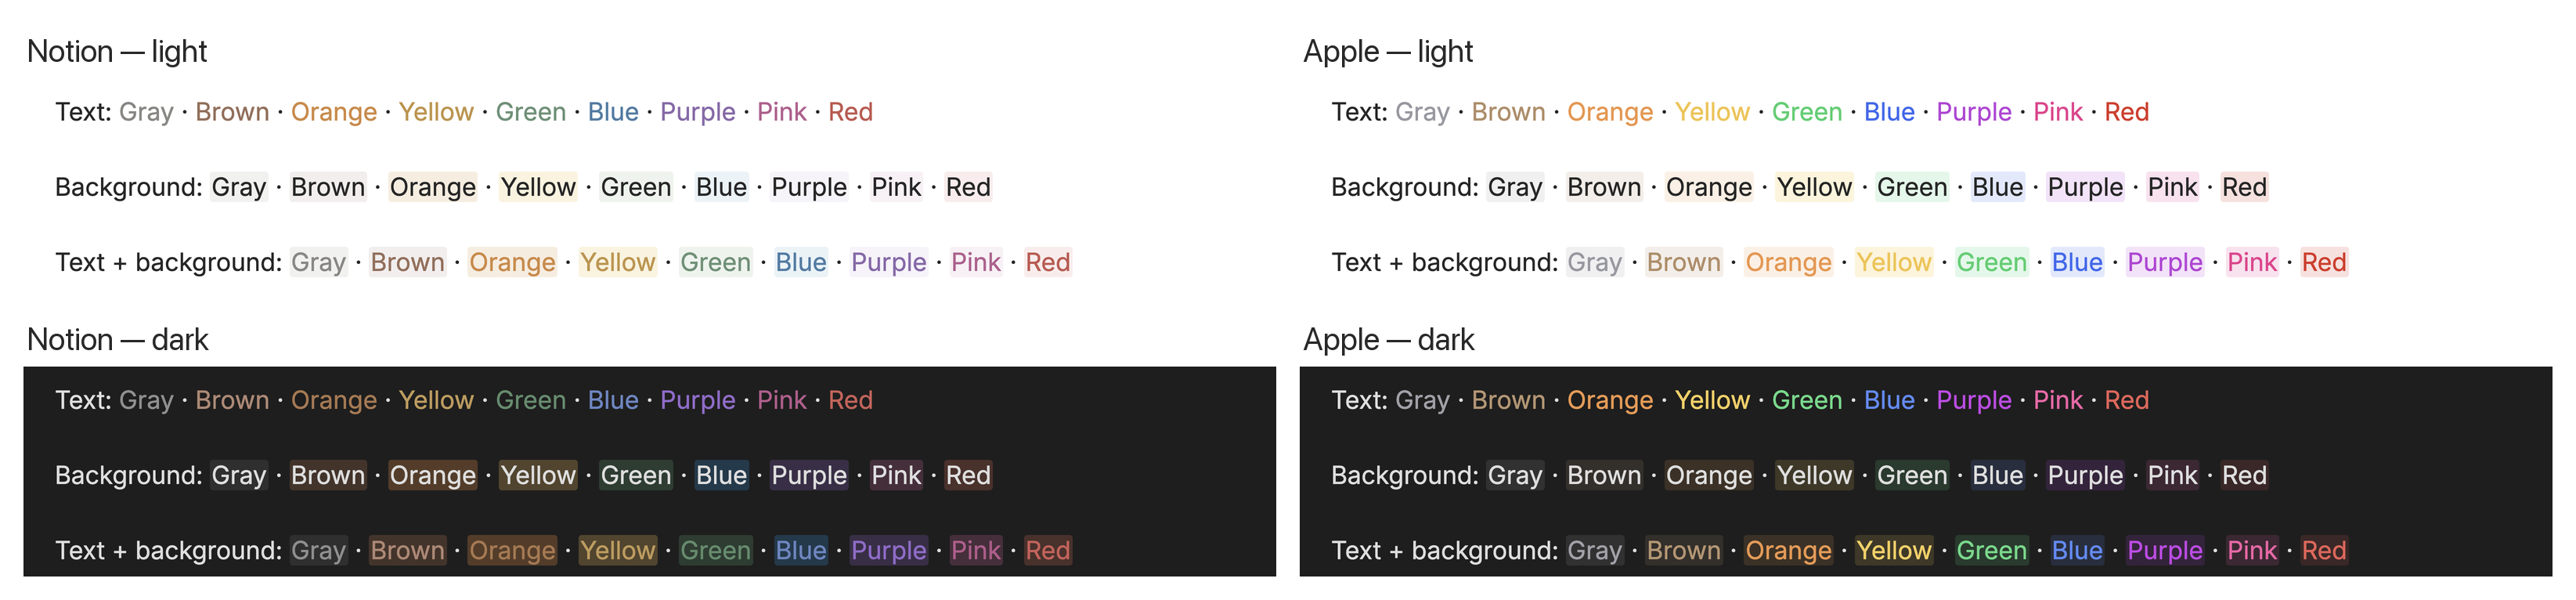 **Notion** (default):
| Color | Text (light) | Bold text (light) | Background (light) | Text (dark) | Bold text (dark) | Background (dark) |
| --- | --- | --- | --- | --- | --- | --- |
| Gray | `#888784` | `#787774` | `#F1F1EF` | `#8F8F8F` | `#9B9B9B` | `#2F2F2F` |
| Brown | `#976D57` | `#976D57` | `#F3EEEE` | `#B28773` | `#B28773` | `#46332A` |
| Orange | `#D1873F` | `#CC782F` | `#F8ECDF` | `#AD774D` | `#BD8052` | `#573C27` |
| Yellow | `#C29343` | `#C29343` | `#FAF3DE` | `#C29A56` | `#C29A56` | `#53442C` |
| Green | `#679176` | `#548164` | `#EEF3EC` | `#5C8C6B` | `#659C75` | `#2A3C31` |
| Blue | `#487CA5` | `#487CA5` | `#E9F3F7` | `#6786C4` | `#6786C4` | `#1E394C` |
| Purple | `#8A67AB` | `#8A67AB` | `#F6F3F9` | `#956ACD` | `#956ACD` | `#3A2E47` |
| Pink | `#B75D8F` | `#B35488` | `#F8F1F5` | `#B85A8C` | `#C25F94` | `#492E3B` |
| Red | `#C4554D` | `#C4554D` | `#FAECEC` | `#CF5D57` | `#CF5D57` | `#4D302B` |
**Apple** (backgrounds are a translucent tint of the text color, and bold text uses the same color):
| Color | Text (light) | Background (light) | Text (dark) | Background (dark) |
| --- | --- | --- | --- | --- |
| Gray | `#9898A0` | `#9898A026` | `#A0A0A7` | `#A0A0A726` |
| Brown | `#B38C65` | `#B38C6526` | `#B8946F` | `#B8946F26` |
| Orange | `#F09343` | `#F0934326` | `#F09748` | `#F0974826` |
| Yellow | `#F4C242` | `#F4C24233` | `#F6CE55` | `#F6CE5526` |
| Green | `#30CF6A` | `#30CF6A26` | `#51DB84` | `#51DB8426` |
| Blue | `#3869F0` | `#3869F026` | `#598BF8` | `#598BF826` |
| Purple | `#BB3ED9` | `#BB3ED926` | `#CA43EA` | `#CA43EA26` |
| Pink | `#ED358E` | `#ED358E26` | `#F75FA8` | `#F75FA826` |
| Red | `#DE2E21` | `#DE2E2126` | `#EC5F55` | `#EC5F5526` |
Each color can be customized in settings (see below) by its text color; its highlight is generated to match, and customized colors override the scheme's.
> **Note:** Colors are saved as HTML (``, ``) and get their look from this plugin's CSS. If you disable the plugin, the text stays but the colors stop showing.
### Inline formatting
| Button | Markdown |
| --- | --- |
| Bold / Italic | `**text**` / `*text*` |
| Underline | `text` |
| Strikethrough | `~~text~~` |
| Inline code | `` `text` `` |
| Inline equation | `$text$` |
| Link | Type or paste a URL and press **Enter** → `[text](url)` |
| Clear formatting | Removes bold, italic, underline, strikethrough, highlights, colors, code and block markers from the selection |
Every button toggles: click it again on the same selection to remove the formatting. Formatting a colored selection works too, because the markers are placed inside the color tag so Live Preview renders them correctly.
### Other buttons
- **More (⋯)**: opens Obsidian's command palette.
- **Comment**: adds a comment to the selection.
- If the [Notion-style Comments](https://github.com/jiwooroh/obsidian-document-comments) plugin is enabled, it opens that plugin's **Add comment**.
- Otherwise it makes a native Obsidian comment, `%%text%%`, using Obsidian's built-in **Toggle comment** (the same as `Cmd/Ctrl + /`). Click again to remove it.
- You can choose which one to always use under **Settings → Notion Selection Toolbar → Comment style**.
**Notion** (default):
| Color | Text (light) | Bold text (light) | Background (light) | Text (dark) | Bold text (dark) | Background (dark) |
| --- | --- | --- | --- | --- | --- | --- |
| Gray | `#888784` | `#787774` | `#F1F1EF` | `#8F8F8F` | `#9B9B9B` | `#2F2F2F` |
| Brown | `#976D57` | `#976D57` | `#F3EEEE` | `#B28773` | `#B28773` | `#46332A` |
| Orange | `#D1873F` | `#CC782F` | `#F8ECDF` | `#AD774D` | `#BD8052` | `#573C27` |
| Yellow | `#C29343` | `#C29343` | `#FAF3DE` | `#C29A56` | `#C29A56` | `#53442C` |
| Green | `#679176` | `#548164` | `#EEF3EC` | `#5C8C6B` | `#659C75` | `#2A3C31` |
| Blue | `#487CA5` | `#487CA5` | `#E9F3F7` | `#6786C4` | `#6786C4` | `#1E394C` |
| Purple | `#8A67AB` | `#8A67AB` | `#F6F3F9` | `#956ACD` | `#956ACD` | `#3A2E47` |
| Pink | `#B75D8F` | `#B35488` | `#F8F1F5` | `#B85A8C` | `#C25F94` | `#492E3B` |
| Red | `#C4554D` | `#C4554D` | `#FAECEC` | `#CF5D57` | `#CF5D57` | `#4D302B` |
**Apple** (backgrounds are a translucent tint of the text color, and bold text uses the same color):
| Color | Text (light) | Background (light) | Text (dark) | Background (dark) |
| --- | --- | --- | --- | --- |
| Gray | `#9898A0` | `#9898A026` | `#A0A0A7` | `#A0A0A726` |
| Brown | `#B38C65` | `#B38C6526` | `#B8946F` | `#B8946F26` |
| Orange | `#F09343` | `#F0934326` | `#F09748` | `#F0974826` |
| Yellow | `#F4C242` | `#F4C24233` | `#F6CE55` | `#F6CE5526` |
| Green | `#30CF6A` | `#30CF6A26` | `#51DB84` | `#51DB8426` |
| Blue | `#3869F0` | `#3869F026` | `#598BF8` | `#598BF826` |
| Purple | `#BB3ED9` | `#BB3ED926` | `#CA43EA` | `#CA43EA26` |
| Pink | `#ED358E` | `#ED358E26` | `#F75FA8` | `#F75FA826` |
| Red | `#DE2E21` | `#DE2E2126` | `#EC5F55` | `#EC5F5526` |
Each color can be customized in settings (see below) by its text color; its highlight is generated to match, and customized colors override the scheme's.
> **Note:** Colors are saved as HTML (``, ``) and get their look from this plugin's CSS. If you disable the plugin, the text stays but the colors stop showing.
### Inline formatting
| Button | Markdown |
| --- | --- |
| Bold / Italic | `**text**` / `*text*` |
| Underline | `text` |
| Strikethrough | `~~text~~` |
| Inline code | `` `text` `` |
| Inline equation | `$text$` |
| Link | Type or paste a URL and press **Enter** → `[text](url)` |
| Clear formatting | Removes bold, italic, underline, strikethrough, highlights, colors, code and block markers from the selection |
Every button toggles: click it again on the same selection to remove the formatting. Formatting a colored selection works too, because the markers are placed inside the color tag so Live Preview renders them correctly.
### Other buttons
- **More (⋯)**: opens Obsidian's command palette.
- **Comment**: adds a comment to the selection.
- If the [Notion-style Comments](https://github.com/jiwooroh/obsidian-document-comments) plugin is enabled, it opens that plugin's **Add comment**.
- Otherwise it makes a native Obsidian comment, `%%text%%`, using Obsidian's built-in **Toggle comment** (the same as `Cmd/Ctrl + /`). Click again to remove it.
- You can choose which one to always use under **Settings → Notion Selection Toolbar → Comment style**.
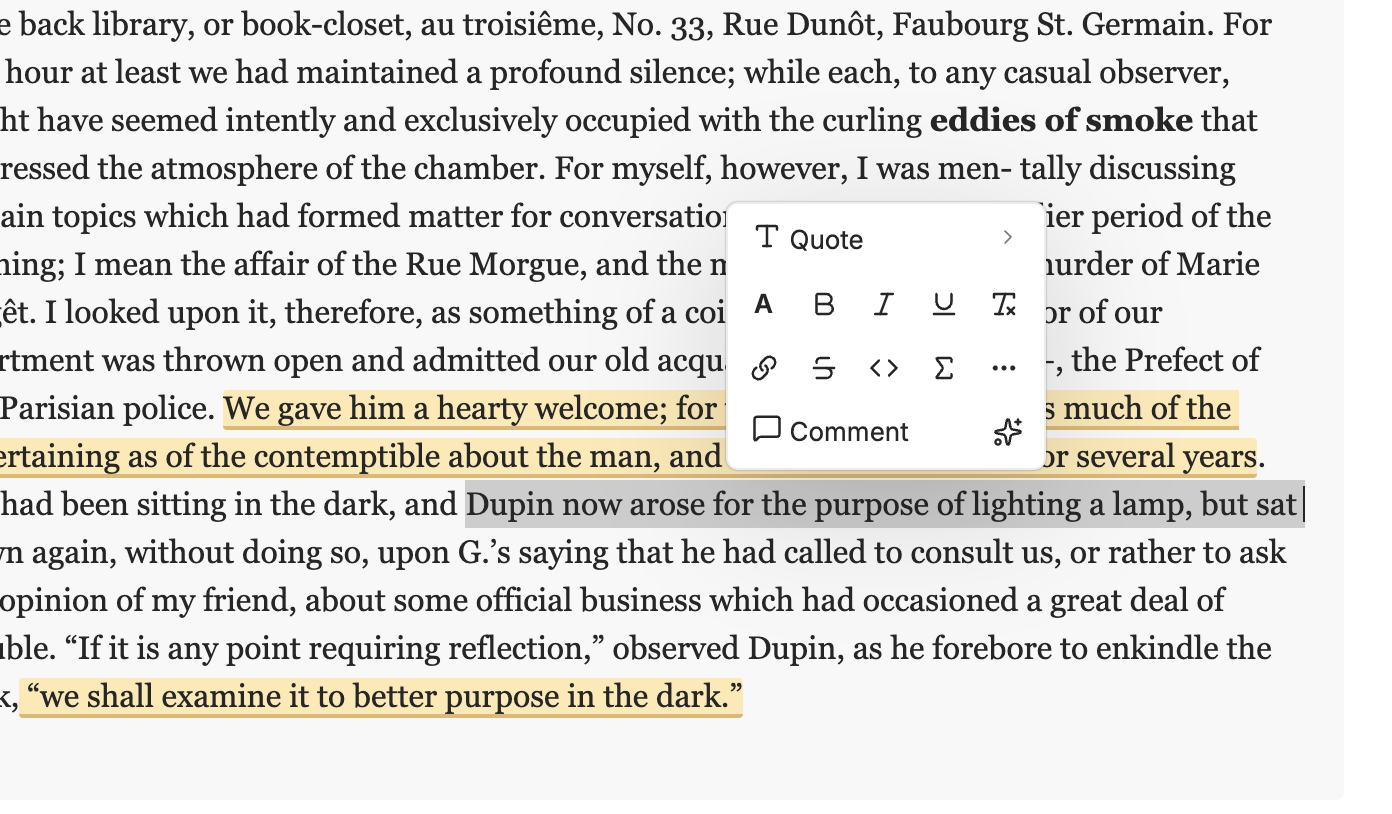 - **Custom button (✨)**: runs any command you assign to it in settings (see below).
## Settings
Go to **Settings → Notion Selection Toolbar**:
- **Custom button (✨)**: runs any command you assign to it in settings (see below).
## Settings
Go to **Settings → Notion Selection Toolbar**:
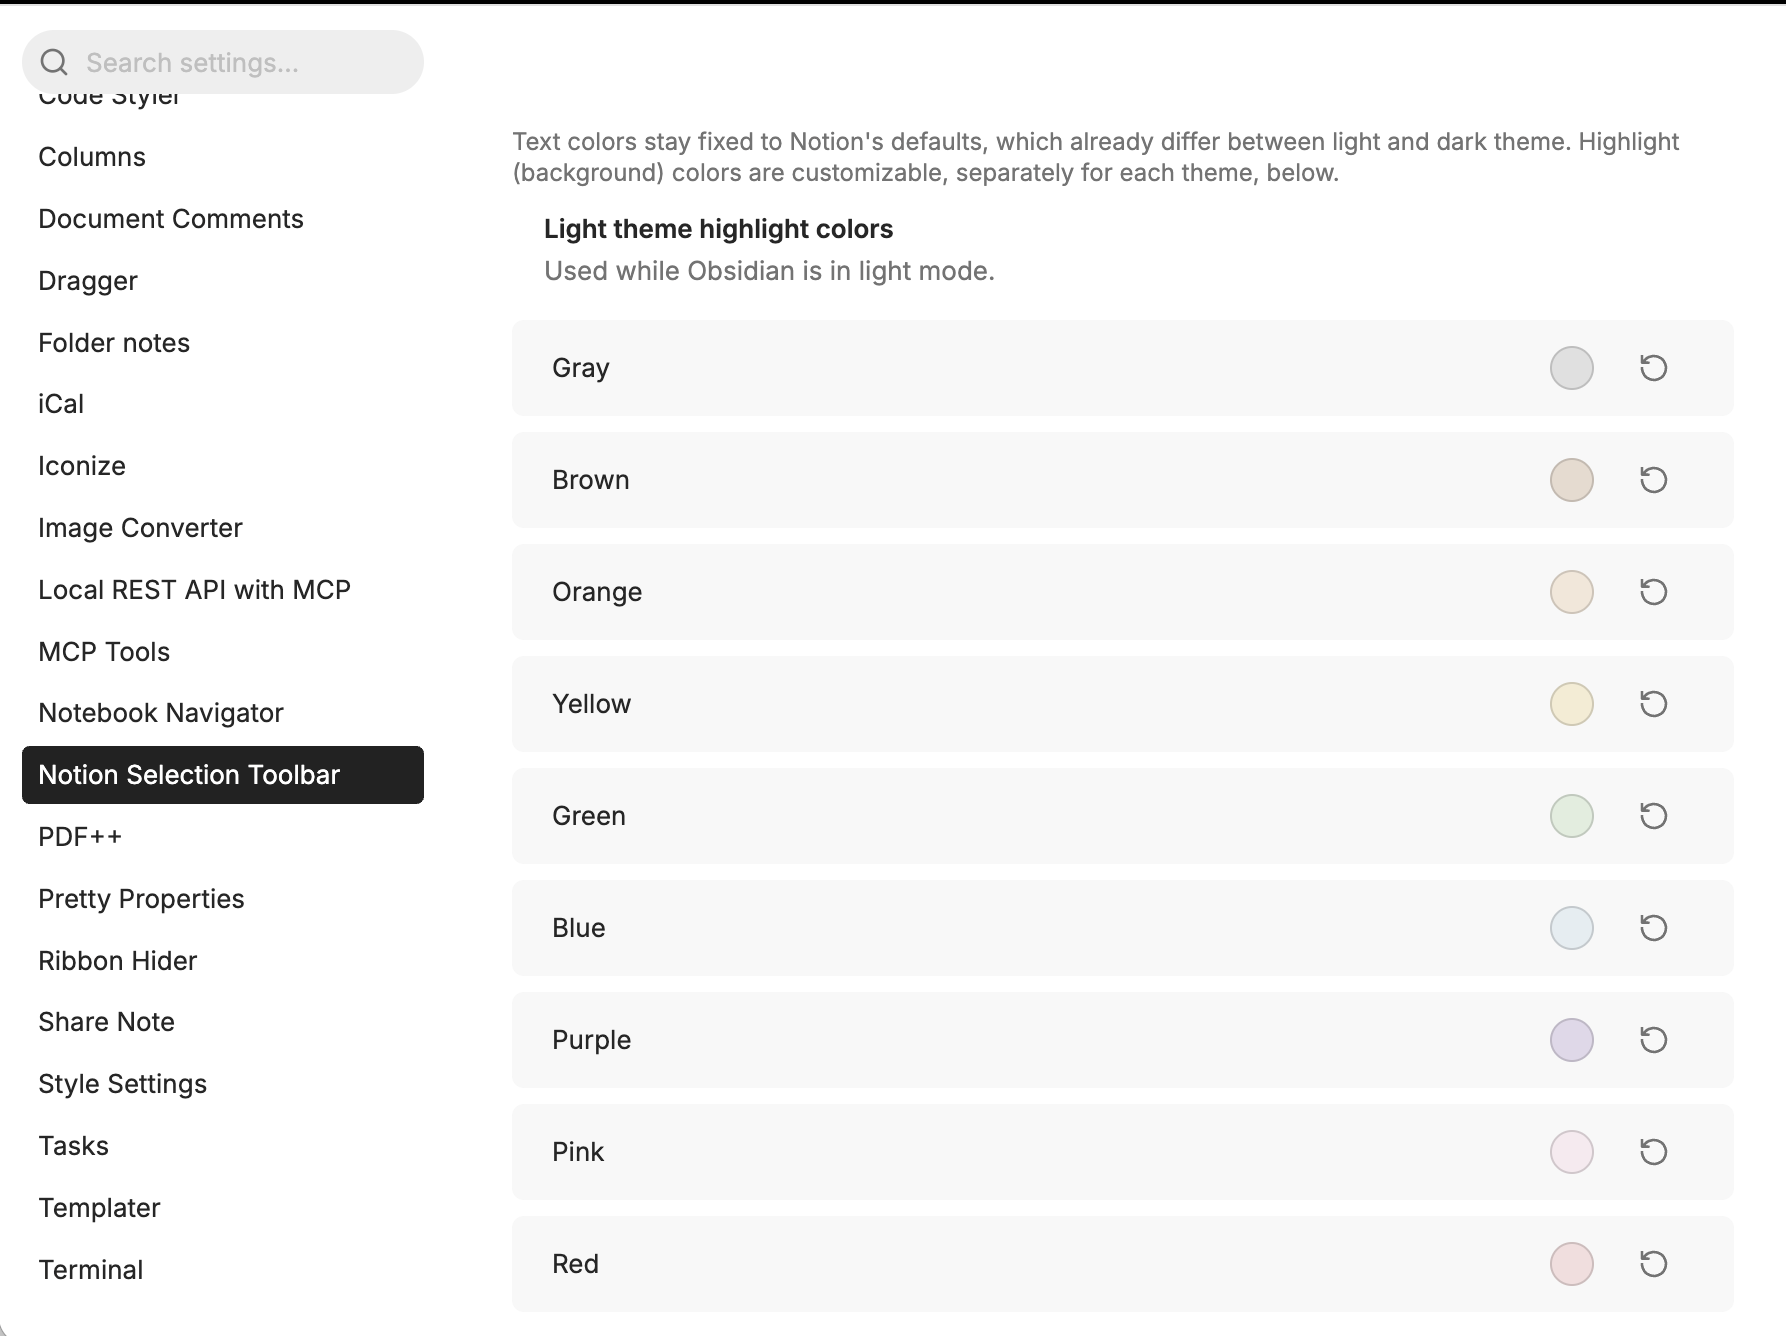 - **Color scheme**: **Notion** or **Apple** palette for text and highlight colors (see [Colors](#colors)).
- **Light / Dark theme colors**: change each color's text color, separately for light and dark mode. The matching highlight (background) is generated from it automatically, and a preview shows the text on its highlight. Use the ↺ button to go back to the scheme's color. Colors already in your notes update immediately.
- **Comment style**: what the Comment button does. **Automatic** (default) uses Notion-style Comments when it's enabled and native `%%` comments otherwise. You can also pick one of the two to always use.
- **Custom toolbar button**
- **Command**: pick any command from the command palette for the button to run.
- **Icon**: any [Lucide](https://lucide.dev/icons) icon name, e.g. `sparkles`, `star`, `zap`, `bookmark`.
## Commands & hotkeys
| Command | Default hotkey |
| --- | --- |
| Apply most recently used color | `Cmd/Ctrl + Shift + H` |
| Toggle strikethrough | – |
| Toggle underline | – |
You can bind or change hotkeys under **Settings → Hotkeys**.
## Installation (manual)
1. Download `main.js`, `manifest.json`, and `styles.css` from the [latest release](https://github.com/jiwooroh/notion-selection-toolbar/releases/latest).
2. Put them in `/.obsidian/plugins/notion-selection-toolbar/` (create the folder if it doesn't exist).
3. Restart Obsidian, then enable **Notion Selection Toolbar** under **Settings → Community plugins**.
## Development
```bash
npm install
npm run dev
```
## License
MIT
- **Color scheme**: **Notion** or **Apple** palette for text and highlight colors (see [Colors](#colors)).
- **Light / Dark theme colors**: change each color's text color, separately for light and dark mode. The matching highlight (background) is generated from it automatically, and a preview shows the text on its highlight. Use the ↺ button to go back to the scheme's color. Colors already in your notes update immediately.
- **Comment style**: what the Comment button does. **Automatic** (default) uses Notion-style Comments when it's enabled and native `%%` comments otherwise. You can also pick one of the two to always use.
- **Custom toolbar button**
- **Command**: pick any command from the command palette for the button to run.
- **Icon**: any [Lucide](https://lucide.dev/icons) icon name, e.g. `sparkles`, `star`, `zap`, `bookmark`.
## Commands & hotkeys
| Command | Default hotkey |
| --- | --- |
| Apply most recently used color | `Cmd/Ctrl + Shift + H` |
| Toggle strikethrough | – |
| Toggle underline | – |
You can bind or change hotkeys under **Settings → Hotkeys**.
## Installation (manual)
1. Download `main.js`, `manifest.json`, and `styles.css` from the [latest release](https://github.com/jiwooroh/notion-selection-toolbar/releases/latest).
2. Put them in `/.obsidian/plugins/notion-selection-toolbar/` (create the folder if it doesn't exist).
3. Restart Obsidian, then enable **Notion Selection Toolbar** under **Settings → Community plugins**.
## Development
```bash
npm install
npm run dev
```
## License
MIT